_________________________________________________________________
animation tutorial-2 : walk cycle
Posted by dermot on November 1, 2008 at 12:07 am
Most sane people have a fear of animating walk cycles. Many events are happening at the same time, and it can seem overwhelming. A single mistake on your first drawing can wreck the rest of the scene. However, the process can be broken down into a series of steps which can go some distance in simplifying the process.
A walk cycle can be described by four distinct poses:
CONTACT, RECOIL, PASSING and HIGH-POINT.

These four poses and a handful of inbetween drawings constitute a walk cycle. The single most important frame of the four is the contact pose. Once you draw it you have already determined 80% of the rest of your walk. If you make a mistake on your contact pose, it can be very difficult to correct later on. Therefore: pay close attention now and save yourself a world of pain.
Here is the contact pose in front and side view.
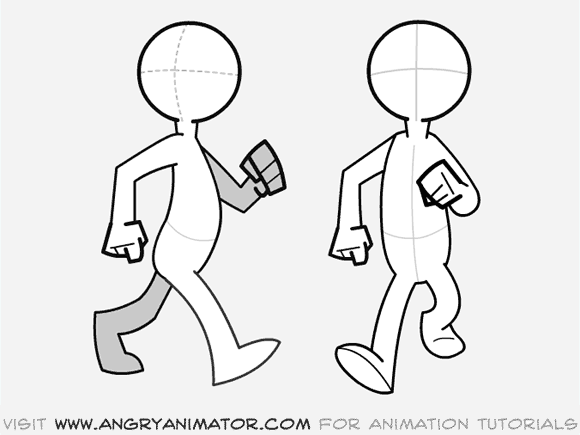 Look at the pose carefully. You will notice some very important details: The feet are at their furthest extension in the walk. That is their most extreme position in the cycle. That alone makes this the most critical pose in the sequence. You can plan an entire walk sequence just by laying out all the contact poses as they work into one another.
Some animators think that the recoil and high points are the most important poses because the head is at its highest and lowest positions. This is wrong. The contact pose is the fundamental building block of a walk cycle. If you do not start your cycle with this pose, then you are doomed. It’s as simple as that.
When the right foot is forward, the right arm is back, and vice versa. This is called “counterpose”. This is how nature keeps everything in balance when you move: one side of the body “opposes” the other. Good animation has these “opposing actions” all the time. If animation seems weak or unnatural to you, it is frequently because it lack opposing action. You can think of a walk as a series of “falls”. The character propels himself forward by leaning into the walk as he moves forward. His trailing foot constantly swings forward to catch himself before he moves on to the next “fall” in the sequence. It shares many attributes with the bouncing ball in tutorial 1. Look at the front on view.
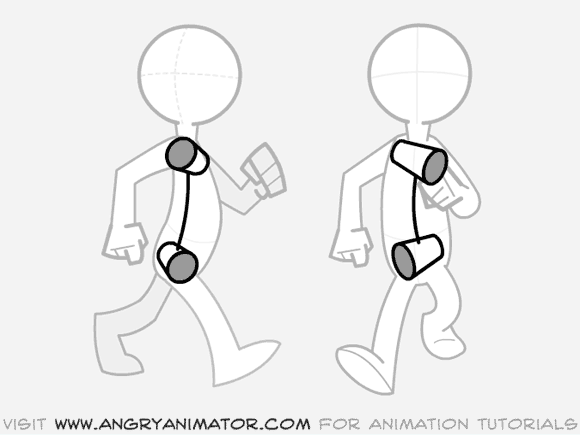
I have drawn in imaginary cylinders to illustrate the orientation of the shoulders and hips. Again, as one is thrust forward, the other is thrust back. As one tilts up, the other tilts down.
Another name for this is “Torque”. It is a fundamental principle of good posing. It should be an element of almost every figure drawing that you do. Michelangelo always used torque in his sculptures, creating dynamic poses, even in ones that were standing still. One hip takes the weight, while the other passively provides the balance.
The body is very rarely symmetrical: indeed, symmetry can be your enemy.
Now look at the recoil pose, the second main pose in the cycle.
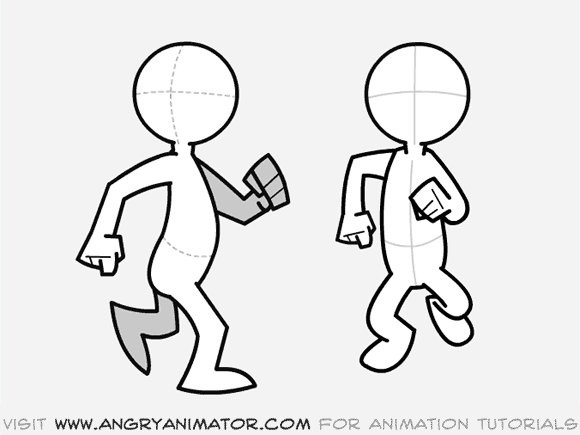
This is the frame where the character impacts the ground. It is also the lowest point in the cycle. The characters arms are furthest from the body as a result of the force of hitting the ground. The front foot is fully in contact with the ground; the rear foot has just lifted up from it.
Note that the leading foot is directly beneath the body, supporting the weight above it. Too many beginners produce recoil poses where the foot is not beneath the body, but several inches ahead of it. Try to avoid this.
To keep things simple, let’s skip the passing pose…it’s closer to being an inbetween. Let’s look at the high point.
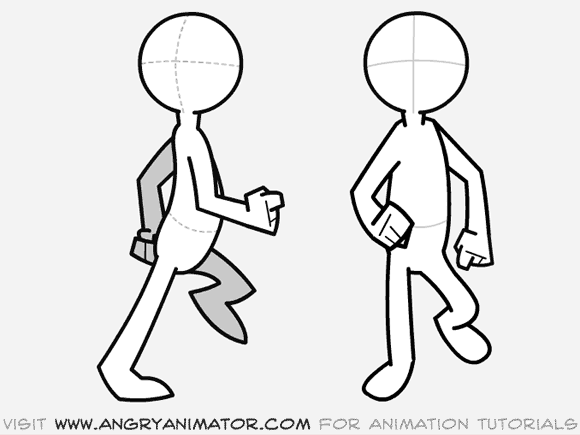
This is the highest point in the cycle. The character’s body is stretched to the maximum as he lifts his leading leg forward to reach the next contact position. The heel of the trailing foot is just beginning to leave the ground.
Those are the three most important poses to remember when creating a walk animation. If you can wrap your head around them, you will have a much better chance of completing a satisfactory walk cycle.
There are two basic ways to animate a walk cycle. You can animate the cycle “in place” or across the screen. Here is the same scene shown in each style.
Why animate in place? There is one main advantage:
You only have to draw a single stepping cycle, then you can reposition it across the screen, saving time and paper.
The main disadvantages of animating in place:
1.It can be confusing.
2.The “arcs” on the character can look weird when the character is moved across the screen.
3.It can be difficult to match the character properly to the background, if he has to register to something on it.
I am going to show you how to animate a character walking across the page. Once you feel comfortable with that, an in-place walk cycle should be slightly less intimidating.
Let’s begin.
Look at this image:

This shows the keyframes of a walk cycle moving across the screen. The most important pose is the contact pose. Use this image as an overall guide to your scene.
1.Guideline.
On a clean sheet of paper, draw two parallel horizontal lines moving across the bottom of the page.
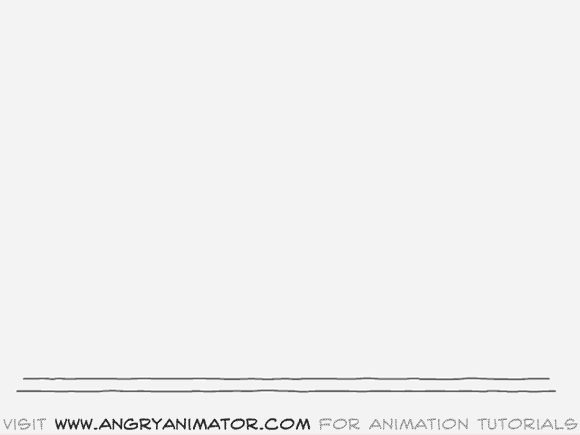
These are the lines that the feet will follow as they walk across the page. Without these lines to guide you, your character can drift either too high or too low on the page.
2.Draw the first contact pose.
Put a clean sheet of paper down over the guideline drawing. You are going to draw the first contact drawing.
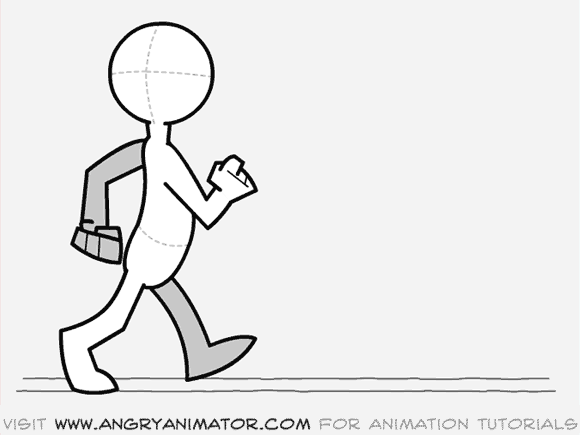
Position the heel of the right foot on the lower line; position the toes of the left foot on the upper line. Name this drawing #1, and since it is a contact pose I usually write the letter “c” in the top right of the page, above and away from the frame number. (This is a habit of mine, I don’t know if anyone else does it….you will find that it helps to reduce confusion when you have 12 drawings flying all over your drawing board.) Don’t forget to circle the drawing number, since it is a key.
3. Draw the second contact pose, drawing 7.
If you have a backlight then switch it on. Put down a clean sheet. Number it #7. Circle the number, as this is a key frame. Write the letter “C” above the frame number, to remind you that it’s a contact pose.
Note that the second contact pose occurs about half a second after the first. Here’s how you position the second contact relative to the first: The leading foot on #1 will be the trailing foot on #7. In this case the right foot is about to contact the ground on #1. In frames #1 through #7 it is going to hit the ground and more or less stay there. By frame #7 it will have begun to lift off the ground. Look at the picture below to see how #1 works into #7:
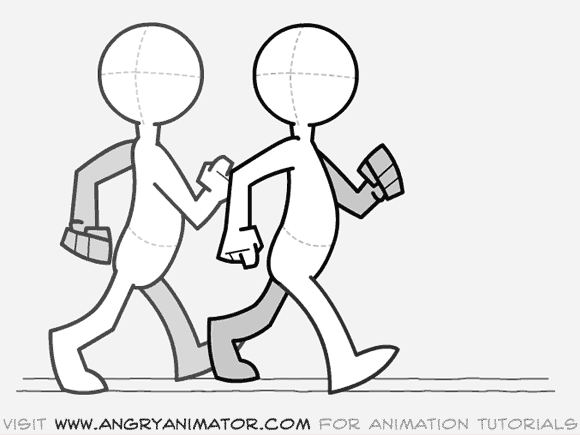
The right foot (the leading one) has touched the ground and the entire body has moved forward. The left foot (the far one) has now swung forward and is now about to contact the ground.
Lightly sketch it in, keeping the overall attitude as similar to #1 as possible. The only differences will be the arms, legs and orientation of the hips, all of which will be reversals of #1.
After you have roughly sketched in the second contact pose, you’ll have to check it against the first. Lift #7 off the pegs, and position it over #1. Flip #1 against #7 to see that both drawings have the same volume and attitude. You don’t want either to look bigger or smaller than the other. Also, both should be leaning forward into the walk at the same angle. If not, your walk will look more like a limp.
Now that you have drawn these two poses, you can begin to block in the main keys between them. First, an overview of what is going to happen.
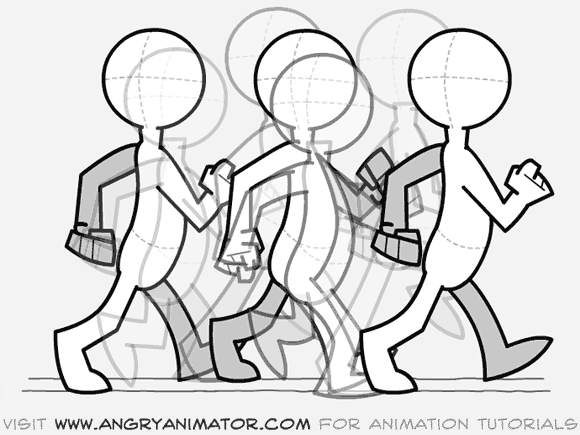
Here are the main keys. The contact, recoil and high point drawings. Remember these positions when you begin to draw them in on their own sheets of paper. If you were to positon #2 too high for example, it would make #5 very difficult to draw properly: the overall action would be too “tight”…not enough bounce in the walk.
This would feel like a very stiff cycle, unnatural for a cartoony character. See what I mean below:
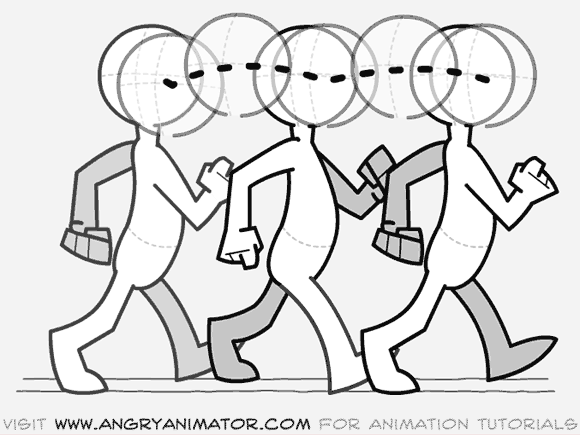
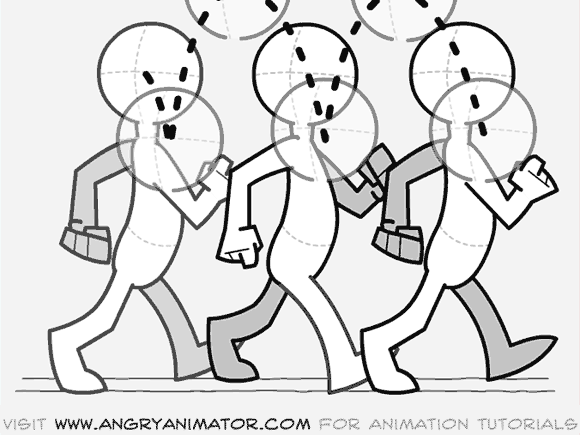
The opposite is also dangerous: moving the recoil too far down can result in a wildly exagerrated action, too unbelievable for all but the weirdest characters:
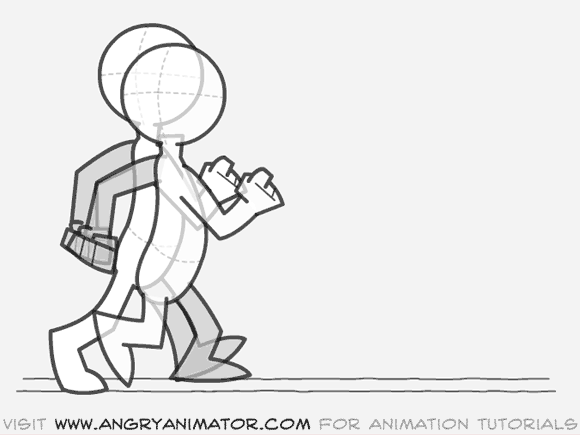
Just bear in mind that after the first contact, the character works down into the recoil, then up into the high point, then back into the next contact where the pattern is repeated:
4. Draw the recoil pose
(Bear in mind my rant in the previous paragraph). Put down a clean sheet, number it #2 in the top right of the page, write the letter “R” beside that, and draw the character as his foot hits the ground. The character will be at his lowest point in the cycle. Don’t move the head and body too far forward or you can inadvertently cause any number of arcing problems later on.
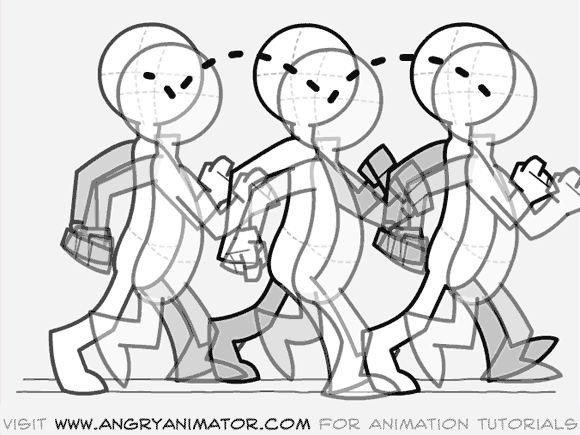
I find as a general rule of thumb that the body should fall by half a head to one head in height to keep the walk “bouncy” enough. (It’s a common beginner’s mistake to keep the figure at the same height throughout the entire walk.)
Remember…the recoil position will be almost identical later in the walk, on the subsequent step:
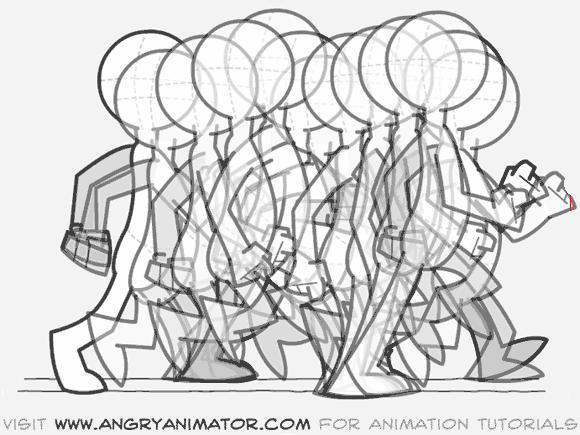
This is what will determine the overall arc pattern, and the positions of all the poses inbetween the recoil and the following contact pose. On the recoil pose the character impacts the ground. The rear foot lifts off, and the arms are extended to their maximum from the body because of the force of hitting the ground.
Now a brief note on the overall timing of a walk.
The most general type of walk cycle is completed over the course of one second. This means that the character makes a single step every half second. This is known as hitting beats, and luckily two beats a second is a typical musical pattern, or so I’m told. We’re animating this scene on the typical 12 frames per second, therefore the overall sequence of drawings so far will look like this:
#01:contact
#02:recoil
#03:
#04:
#05:
#06:
#07:contact (much like #1, but for the reversal of the legs and arms).
#08:recoil
#09:
#10:
#11:
#12:
#13:contact ( a duplicate of #1, only further to the right).
As you can see, a complete cycle works from #01 to #12, beginning its repeat on#13. I put the recoil immediately following the contact without an inbetween between them because an inbetween frame would make it look “mushy”. The contact should usually snap into the recoil immediately, without an intervening drawing.
I have not named the frame that the high point will go on. I could assign it as #4 #05 or #06. A different frame number will make quite a difference to the properties of the character. Here is why:
If #04 is the high point the walk will look like this:
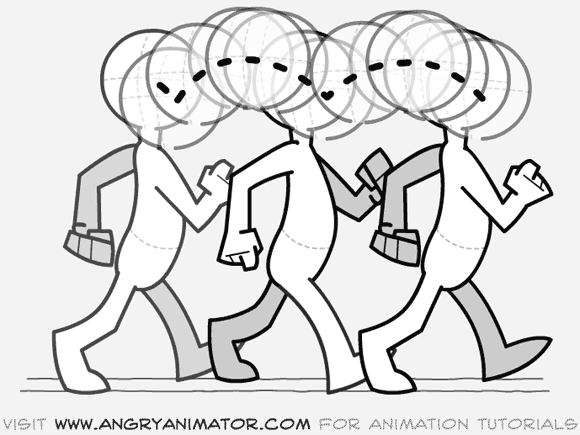
As you can see above, this makes the character “bounce off the ground very quickly, making him light footed.
If #06 is the high point the walk will look like this:
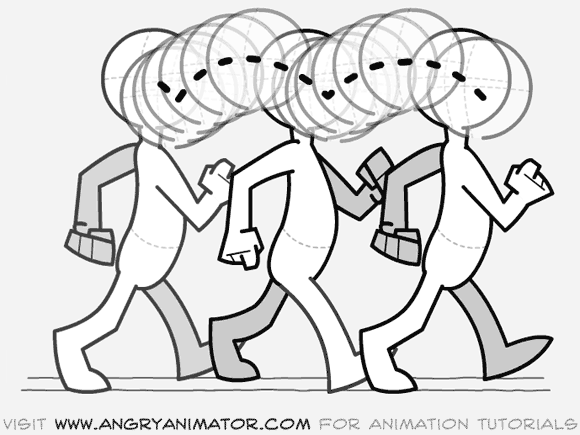
This timing above slows down the character as he rises from the recoil pose, making him seem a lot heavier.
I will take the middle path and name the high point #05, resulting in this:
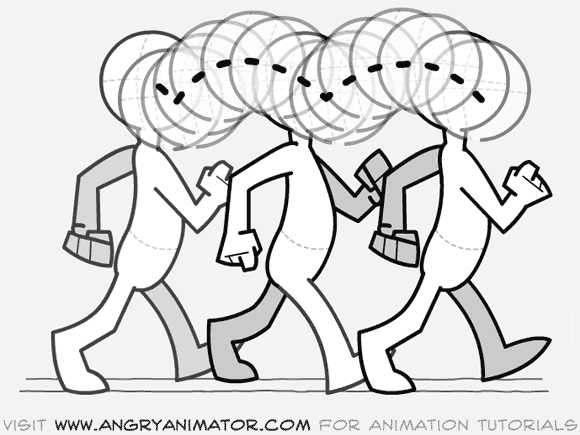
This is a more even timing: it should make the character seem like an average weight, without any extreme attributes. These are the kinds of decisions that you should make before you begin animating. Now we can look at our overall exposure sequence again:
#01:contact
#02:recoil
#03:
#04:
#05:high point.
#06:
#07:contact (much like #1, but for the reversal of the legs and arms).
#08:recoil (like #02, arms and legs reversed).
#09:
#10:
#11:high point. (like #05, arms and legs reversed).
#12:
#13:contact ( a duplicate of #1, only further to the right).
Now we have our 3 main key frames, #1 #2 and #5, and their near twins #7 #8 and #11. The empty spaces in the sequence above will all be inbetweens. Don’t worry about them yet.
For now we will focus on #1 thru # 07, finishing a single step.
5. Draw the high point.
Put down a clean sheet. As explained above, this will be drawing number #5. Write the number in the top right of the page. Circle it. Write a small letter “H” above the number. Now begin the drawing:

You have a little more freedom when drawing the limbs on the high point than on the recoil, as the leading foot is up in the air, and the arms are swinging over a pretty wide space. That gives you a number of different possibilities. The example frame that I have included is fairly typical.
The most important thing to get right with this drawing is the arc path of the head and body. A mistake on this one frame will effect all the inbetween frames around it.
Once that is finished, you are ready to move on.
6.Add the timing charts.
Before you do anything else, you should add the timing charts to describe the correct positions of the inbetweens. Here are the drawings we have finished so far:
#01:contact
#02:recoil
#03:
#04:
#05:high point.
#07:contact (much like #1, but for the reversal of the legs and arms).
Timing charts need to be added to #2 and #5. The timing chart on #2 will describe the positions of #3 and #4 as they work into #5. The chart on #5 will describe the position of #6.
Put #2 on the drawing board. Underneath the frame number in the top right corner of the page, you will add the chart. Here’s what it should look like:
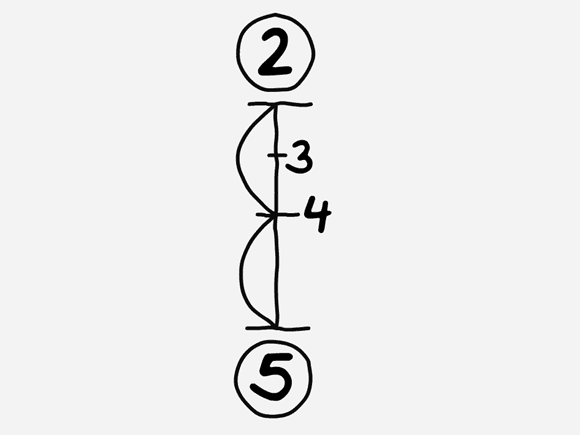
As you can see, #4 is the main inbetween halfway between the two keyframes. #3 is a smaller inbetween which will completely smooth out the motion.
The next timing chart to be added is on #5. Put #5 on the drawing board and write a timing chart beneath the drawing number in the top right corner of the page. It should look like this:
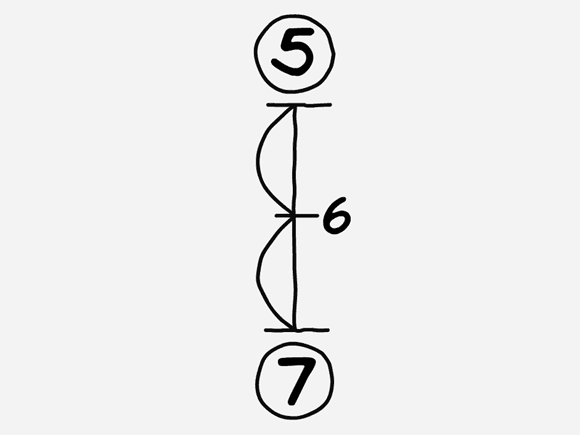
This shows that #6 will be a single inbetween halfway between #5 and #7. Now it’s time to draw the inbetweens.
7.Draw #4: the main inbetween.
Be sure that you have the guideline drawing on the drawing board.Put #2 on the pegs. Now put #5 above that. Put a clean sheet on top of all three. Switch on the backlight. Now you must draw #4, also known as the “passing position”. Some treat it as a key also, but to simplify things, I’m treating it as an inbetween. I’ve never really found it to be as critical as contact, recoil or high point poses.
You have to flip between #4 and the two key frames beneath it. You should remember that from the bouncing ball tutorial:
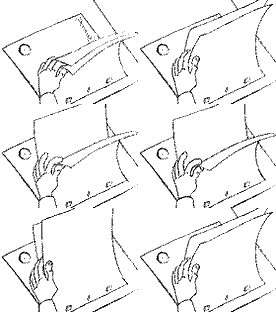
Again, be sure that your character follows the arc path as he walks. When you’re finished the drawing, remove the drawings from the pegs and place #2, #4 and #5 back on the pegs in that sequence. Now you can roll them to see if they move properly. You’ll also remember that from the bouncing ball tutorial.
 If you see any errors in your inbetween, then you must lift the drawings off the pegs again, then place #2 on the bottom, #5 above it, and #4 on the top. Then you can flip again, correcting any errors that may have crept in. It’s tedious, but it’s the only way to do it.
8.Draw the remaining inbetweens.
Repeat step 7 with #3 and #6. If you do them right then you should be finished with the first half of the walk cycle. I hope you had fun, but I doubt it.
You should be looking at a stack of paper, numbered #1 through #7. If you put all those drawings on the pegs, you should be able to roll them and have a rough idea of what your scene will look like when it’s shot. If anything catches your eye, chances are it’s wrong. Go back in, repeating the process described in step 7, until you’re happy with it.
9.Finish the rest of the cycle (or else).
Repeat the steps above to complete the rest of the walk cycle. You’ll have to draw #13 (the third contact pose) to work into. Simply trace off the pose on #1 onto #13 in its new position, further to the right. If it took 2 inches to make a single step from #1 to#7, then slide #13 over 4 inches to the left and start tracing…
I hope that makes sense.
The second half of the walk is identical to the first, except that the arms and legs will be on the opposite sides of the body.
Indeed, you can refer to the first half of your scene to help you with the second. The recoil pose on #8 should be as similar to the recoil pose on #2 as possible, otherwise the walk may seem uneven, or even more like a limp.
10. A general note about arcs.
Every joint of the body has its own arc path. It’s a good idea to check them all. Here’s how.
Place all your drawings on the board. If you have a backlight switch it on. Pick a body part, e.g. the right wrist. Place a clean sheet over the drawings and draw a small dot on it at the position of the right wrist on frame 1. On the same sheet draw a dot for the position fof the wrist for #2…and so on.
By the time you’re finished you’ll have a sheet of paper that looks like this:

That’s what it looks like if it’s done properly. If you’ve made an arc mistake, it’ll look like this:
 If your walk is to look smooth and natural, your arc paths must also be smooth, curved, natural shapes. You should repeat this process for every part of the body to make sure they all move properly.
If you’re new to this: draw simple cartoony characters at first. Don’t even think of attempting anatomical designs until you’ve gotten comfortable with the simple ones first.
That’s all for now!

Very similar to idle worm posts are you one and the same?
ReplyDelete