18 May, 2012

The Brows Have It ~Victor Navone

A great post about eyebrows!  This can be found on Victor Navone's Blog  I've posted stuff from Victor before, but if you don't know him (or his blog) check him out.  He has tons of resources and is an amazing (self taught) Animator working at Pixar...  Hope this helps you on your next dialogue or pantomime shot!!  Oh there's a link to Carlos' blog in there as well as some great links down at the bottom of the post.

____________________________________________

The Brows Have It


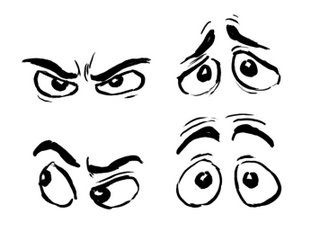
I wanted to do a post about eyebrows after seeing Carlos' post on his blog. If you haven't read it, you might as well do it now, since I'm not covering the same material here. Eyebrows are one of the most important parts of facial animation. Sure, the eyes are the "windows to the soul", but the brows are, like, the window dressing. Okay, that's a crappy stretch of the metaphor. Eyebrows are hugely expressive, though, and can go a long way towards communicating your character's thoughts and emotions. They are capable of bigger shape changes than the eyes alone, and often read better from a distance. Brows also change the shape of the eye; make the shape of your character's upper lids echo the shape of the brows so they feel connected and fleshy.

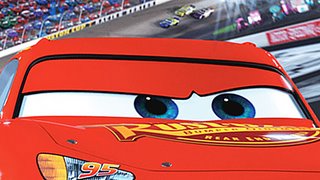
If your character doesn't have brows (such as the characters in Cars) then you must use the upper lids to mimic the behavior of brows.


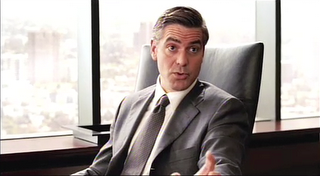
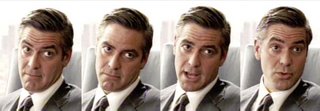
One of my favorite actors to look at for brow expressions is George Clooney (and let's face it, he's pretty easy on the eyes all around!). George has dark, prominent brows and his white scleras stand out against his dark skin, making for really clear, graphic expressions. He also has great comic timing, and when he's directed by the Coen Brothers you end up with some really entertaining performances, like this scene from "Intolerable Cruelty" (click picture to play movie):


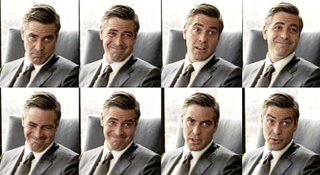
See how clear his attitudes are and how the brow changes lead his turns. He actually does very few gestures and pose changes; most of the acting is in the brows, eyes and the angle of the head. I also love how the wrinkles in his forehead echo the shapes of his brows and emphasize the accents. Here are some choice frames:


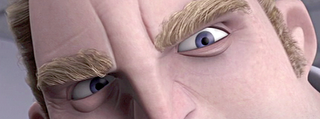
Animation tip: have your brow animation precede any head or body movement. Otherwise the brow action will be lost in the movement and the audience will miss it. This technique also helps to make the character look like he's thinking before he's acting.Below are some stills from a scene in Ratatouille (animated by Michal Makarewicz), in which the deposed chef Skinner tastes the titular dish. Skinner is largely hidden behind the table and his sunglasses, so his brows end up doing much of the acting. You can clearly see the sequence of his emotions in his brow: angry determination, surprise, ecstasy, and back to anger.


And here are some interesting behavioral facts about brows:
  • As the pitch of the voice raises the brows go up
  • As the pitch of the voice lowers, the brows likewise drop
  • When asking a question where the answer is already known, the brows raise
  • When asking a question where the answer is truly unknown, the brows lower
  • Spontaneous facial expressions (surprise, fear, pain, etc.) tend to be symmetrical, where as expressions we choose to make (curiosity, suspicion, contempt, etc.) can be more asymmetrical.
These are just trends, not rules, but they're a good starting point and they work well. Try them!

I'm not going to break down all the muscles involved in brow animation, but I'd like to give special mention to the Corrugator muscle, which pulls the brows together in the middle and results in a tell-tale furrowing above the nose. This is important for intense expressions:
  • Anger
  • Fear
  • Sadness
  • Concentration
  • Stress
  • Disgust
  • Deep thought

Note that you can't raise your brows and furrow them at the same time. You can raise the inner brows and furrow them, which gives a sad expression, and usually results in a twisted fleshy mass as the muscles pull the skin in different directions. It's a good idea to study facial anatomy to help you understand how the muscles of the face work. You don't have to memorize all the muscles' names (I haven't) but it will help you understand how to make more natural expressions and movements. It's also a good idea to study behavioral science to give you some insight into when, how and why humans make the faces they do. Here is some recommended reading on these topics:

The Artist's Complete Guide to Facial Expression
by Gary Faigin
Unmasking the Face by Paul Eckman and Wallace Friesen
Manwatching by Desmond Morris

15 May, 2012

Animating 4 Legged Beasts ~ Gamasutra (Cathy Miller)

So I think I'm going to shift gears here and post something I've been wanting to do since Animation Mentor released it's Animals and Creatures class (click here for details).  I have a couple of projects that I'm working on, but almost finished with.  I want to work a funny dialogue animation then I really want to do a quadrupedal animation of some kind of animal.  My buddy at work sent me this link and it's really intuitive.  It's a bit lengthy, but has some really good stuff in it.

This post is from Gamasutra and was shared by Animator Cathy Feraday Miller . 

Without further ado, here we go!
_________________________________________________________

Getting Started

With a media viewer that can scrub single-frame backwards and forwards, like QuickTime, you can watch the movement frame by frame. Drawing thumbnail images with directional notes helps you synthesize the information.
There are now lots of websites out there that put up live-action animal footage, such as the Rhino House human and animal locomotion website, which has a built-in player that can scrub their video reference material (click the image below to check out their website and viewer). Thanks to the internet, finding reference and getting into it to see what is going on is the easy part. The hard part is converting that information into something that makes sense to the animator and for the character that is to be animated.
Following a process speeds up your workflow. Before I get into the creative part of animating, I usually have all of my research done. Gathering and absorbing all of the technical details and reference material beforehand frees me up to get into the creative flow of animating, with easy access to my reference material. My process is something like this:
1. Consider what animal most closely resembles the beast I need to animate.
2. Search for reference material. Here are the sources I find useful:
3. Analyze the reference material and find the section of the footage that is most useful
4. Create thumbnail drawings to assist with my animation, including notes on direction and any unusual qualities I can see in footage.
5. Animate

The Four Gaits

In the course of my career, I've learned that there is a surprising similarity in how quadrupeds move, from species to species. Eadweard Muybridge's photographic works may be a century old, but they are still relevant and extremely useful.
In his introduction to Animal Locomotion, he maintains that most quadrupeds -- be they dogs, cats, horses or rhinoceroses -- follow the same footfall pattern. This is the order in which the hooves or paws strike the ground while moving through the various gaits. Where they differ is in the flexibility of the spine. Visualize a rhino running, as opposed to a cheetah. The exceptions, according to Muybridge, are elephants, and animals like kangaroos.
The four speeds of movement, or the four "gaits", are shared amongst most four-legged animals. Almost every quadruped walks, trots, canters and gallops, and their legs move in the same manner when they do it.
As you can see in the image below, adapted from Muybridge's Animal Locomotion, the gaits have been broken down into symbols illustrating which leg strikes the ground in which order, assuming the animal is facing north with the right legs on the right and the left legs on the left.
For example, with the rotary gallop gait, if you start your cycle with the left rear foot striking the ground first, the next in sequence to hit the ground would be the right rear foot, then the right fore foot, followed by the left fore foot.
As for the transverse and rotary gallops, I've found the rotary gallop more often in reference material than the transverse, which I've mainly seen in horse footage. The canter is the roughest gait, with a lot of up-and-down movement. Elephants don't seem to follow these rules, and should be considered separately.

image adapted from:
Animal Locomotion, Eadweard Muybridge, 1887
Once you get the legs moving roughly in the order that is appropriate, you can be creative with the rest of the body.
To save time, you could animate a "vanilla" gait cycle for each gait with the leg movements blocked in on keys and breakdowns only and the body and head having the rough up-and-down motion laid in on those keys. If using a universal rig, this file could then be exported onto any beast (with minimal adjustments, depending on the disparities of beast shape) and be used as a starting point for the animations.
Several different types or speeds of walks could also be created from this base file simply by playing with the amount of frames in the animation and the distance between the legs in the stride position or the distance the beast travels in the 'leap' part of the gallop.

The Walk

In the case of the walk gait, the rear left foot strikes first, followed by the left foreleg. The rear right leg strikes third, with the right foreleg falling last. The walk is the slowest gait, and is shared by all quadrupeds. Muybridge breaks down this information into a chart for the walk, trot, canter and gallop gaits in the introduction of Animal Locomotion. Converted into a graphic table, a walk cycle would look like this:

image adapted from: Animal Locomotion, Eadweard Muybridge, 1887
Horses are great animals to study because their legs are so long and slender, creating an easily legible silhouette. Below is an example of a walk cycle broken down into 8 phases:

Image adapted from Horse Locomotion Walk 01, courtesy of www.rhinohouse.com (Click for larger image)
Once you understand what the feet are doing, it becomes easier to understand what to animate next. Think of the quadruped walk as two offset human walk cycles. I wonder how often studios have used two people in a horse costume for motion capture? Preston Blair's iconic walk cycle with the "stride" and "passing" key positions is a great illustration of the basics of a biped walk demonstrating the following: fall into the stride and recover and rise up into the passing position.

Adapted from Preston Blair, Animation, 1948
For the quadruped, the hips and chest become two offset "bouncing balls" in the same manner as the hips in a bipedal walk. Consider circled image 23 from the horse walk cycle (below), which shows the forelegs in the "stride" position and the hind legs in the "passing" position. I've added circles to show the up and down motion of the hips and chest in that phase of the movement. The head could then be animated as yet another bouncing ball, offset from the hips and chest (follow-through! overlap!)

Image adapted from Horse Locomotion Walk 01, courtesy of www.rhinohouse.com

Animating A Walk

To illustrate this locomotion in 3D animation, I've roughed in a slow 40-frame walk cycle. Cycles must be symmetrical, or there will be a visible hitch in the walk, like a limp, or a hit in the animation.

JoJo character, courtesy of Rocket 5 Studios. Watch the animation by clicking here.
There are almost as many methods of animating as there are animators, but I prefer to approach posing as I would with 2D, or classical, animation. Posing out the whole character, rather than starting with the hips or isolating the lower body, and working on the entire character at once when creating the four major poses.
Details like toes and tails can be ignored or turned off at this stage. I create the four major keys or poses of the walk: two stride and two passing. I make them as symmetrical as possible, but they don't have to be mathematically the same.
There is an advantage to keying all major elements on the same frame. At this point, the keys can be slid around easily to change the timing of the walk. It is quick and easy to adapt and manipulate your cycle by figuring out your basic timing to the point where you start to add finishing details like overlap and follow-through. Keys arranged in an orderly fashion are really easy to manipulate in your 3D software package (here I am using the dope sheet in Maya 2011).

Four key poses, JoJo walk, property of Rocket 5 Studios (Click for larger image)
This is also the break off point where different kinds of walk cycles can be created now that the feet have been appropriately positioned. Variety can be added, like floppy overlap or stealthy sneak. The four basic poses can also be used as a starting point for other walks. You don't have to recreate the four basic key poses; you only have to adapt them to your specific purposes. Use the graph editor or tweak by hand, but remember to have each opposite pose match each other.

JoJo walk cycle, four keys only, with smooth spline interpolation. Watch the animation by clicking here.
It is important that your software has a great graph editor. When animating cycles, I spend a fair amount of time cleaning up the graph to get symmetrical movement. Don't forget to check all channels! The above video has been carefully tweaked to remove all hits and holds. The stage just prior to this revealed a few errors with the arms:

JoJo with wonky arm movement. Watch the animation by clicking here.
There are several ways to fix errors like this but the easiest for me at this stage is to look at the graph editor and find out where there is a problem with the curve.

Note: flat tangents causing slowdown at apex of movement. (Click for larger image)
The highlighted motion trail shows other problems that can be solved by the graph editor, such as the linear movement of the arm in the air. Arcs always look more natural than linear paths of action. The solution for the slowdown in the forward progression of the arm is to fix the curve so that it can cycle smoothly, as seen below.

Grab spline handles and move them so that curve looks like it can cycle or repeat. (Click for larger image)
The next step is to flesh in the walk, adding overlap and follow-through, offsetting the head and making sure there is enough weight in the up and down movements of the hips and chest. When you are pretty sure the cycle is working the way you want it to, animate the feet, hands, fingers and toes. I usually animate the tail last, one rotational axis at a time.

JoJo walk from side view, tail and toes added. Watch the animation by clicking here.


Walks and Runs: In Brief

Walks and runs can be considered a controlled fall with a little acceleration happening right after the passing position, which is similar to a push-off. As with all movement cycles, the forward or Z-translation would be non-linear.
The speed of the walk is dictated by the length of the legs and how far apart the feet are planted in the stride position. There isn't really a moment where all four legs are off the ground, as in the other gaits, and the legs can only move so fast without looking "sped up". Conversely, the speed of gallop is largely determined by the shape and unique qualities of the beast. The faster you need the beast to go, the more flexible the spine will have to be, and the greater the squash and stretch. Look for this when watching reference. As the legs bunch up under the beast (the squash) energy is gathered, preparing for a "leap" or "stretch" where the animal can cover as much ground as its form, weight and strength allow. The tighter the squash, the more extended the stretch and the faster the beast can travel.

Gallop cycle
animated by Paul Capon on Nico
Variety in the weight or "attitude" of the walk, trot, or gallop can be achieved through the shape and movement in the spine and the amount of overlap and follow-through. The amount of flexibility and motion in the spine is key to defining the differences between a horse, a rhino, and a jungle cat.
Personality, the key ingredient in any good animation, comes not only from the shape of the key poses but also from what is happening in between the poses. How the character gets from stride to passing can define the character. Are they high-stepping? Straight forward and no-nonsense? Whimsical? Are they flopping around like a puppy or are they hard and densely muscled like a pit bull? The overlapping elements that you've added to the animation and their follow-through shows the audience who the character is and what it is made of.
Image adapted from Tiger Locomotion Gallop 01, courtesy of www.rhinohouse.com

Image adapted from Horse Locomotion Gallop 05, courtesy of www.rhinohouse.com


03 May, 2012

Pose 2 Pose Animation - AIM

I found this little gem cruising the interwebs.... This is from the Centre for Animation and Interactive Media.  My apologies for slackin' on my notes... I've been buried in projects and haven't had much time to keep up with my Blog.  With that said, let's get going!

This article is a great read, talking about planning, (dynamic) key poses and having everything in order to execute your animation to perfection!  Making sure that you get those main 'story telling' poses in your animation and that it's reading clear, telling the story you want and making sure your scene isn't too busy.  Till next post, keep on animating!
__________________________________________________________________________________

Animation techniques such as cut-outs, clay, paint-on-glass, charcoal on paper etc, make use of a method loosely described as ‘straight-ahead animation' in which the animator starts at the beginning of a sequence and works through to the end. This method is often dictated by the medium which animator is using to create images - the paint or sand, or objects being manipulated. It is a technique which can produce great moments of inspired spontaneity. Ideas come as one plays around with the medium and these can be easily incorporated into the sequence mid-stream without the audience being any the wiser. The animated films of William Kentridge who draws with charcoal on larges sheets of paper are examples of this method. Drawing straight in to Flash with a graphics tablet using the 'light box' or 'onion skin' tool can also employ a ‘straight-ahead' animation method.

But what happens if our cut-outs or clay character misses its cue? Once the parts have been moved, the painted image smudged and destroyed or the plasticine deformed, it is extremely difficult to go back and correct mistakes. A completely different way of working to help solve this problem is the ‘key drawing’ animation method, also called 'pose to pose' animation.

POSE-TO-POSE ANIMATION METHOD
'Key poses', ‘key drawings’ or just 'keys' are terms used to describe those critical positions of an animated character or an object which depict the extreme points in its path of motion, or accents in its expression or mood. For this reason they are also called 'extremes'. This method of animating from one pose to the next, hence the term 'pose to pose' animation, allows the animator to map out the action in advance with ‘sign posts’ by charting up these key poses onto ‘exposure sheets’ or ‘dope sheets’, or indeed into the timeline of computer software. It is a particularly useful animation method when a character must perform certain tasks within a predetermined time or where a series of actions must synchronise accurately with a recorded sound track. The technique helps ensure that characters arrive at a particular place on screen at a precise point in time.

The ‘key pose’ technique is still the most widely used method of animating. It is also the method of choice within most 2D and 3D digital animation packages these days. Sequences can be tested and individual poses can be re-worked and the animation progressively improved. The exposure sheet or timeline is continually revised to provide an accurate record of how the animation is to be photographed or rendered. This production method also provides a logical way of breaking down work so that it can be handed on to other people in the production chain.

WORKING ROUGH
When developing key poses, its a good idea to experiment with thumb-nail sketches first to refine the poses and ideas. Initially, the animator’s key poses may be nothing more than rough scribbles to block out the action. This is often done with a blue pencil. There is no point doing lots and lots of highly finished drawings at this stage if the action does not work. Besides, working roughly and quickly sketching out the main shapes, forms and lines of action knowing that these drawings are just a first step in a bigger process, always leads to fresher animation.
An illustration showing how an animator might work in rough scribbles to find the key masses and shapes and then to refine various lines of action to give the drawing purpose and intent before finally fleshing in the character's final form.
This sequence is from Dann Dann the Dunny Man and is used with the kind permission of past graduate, Peter Viska, Viskatoons.

This is a fine example of working rough to get key poses sorted to describe the action in an expressive manner. This character is handled in a very dynamic way using lots of exaggeration, anticipation and squash and stretch. It also demonstrates how such tests can block out the action in both space and time.

"It occurred to me years ago that my animation process was a lot like my writing process — the first draft was never as good as what was in my head; the more passes I made, the better it got; repetitive phrasing was bad; clarity was good; specificity and authenticity were paramount, and so on. Both are solitary, time-consuming processes, requiring a solid command of a special language." - Kevin Koch 2007

PLANNING KEY POSES
Obviously when planning a set of key poses for a shot or scene, the animator needs to be acutely aware of the requirements of the script and the particular actions and events that are necessary to progress the storyline. Background layouts will define an 'acting space' while storyboard frames will indicate the 'business' of each shot. What is entirely under the animator's control is the way the character 'acts' out these events as informed by an understanding of the character's personality traits, visual design and current emotional state. The key pose planning process goes hand-in-hand with the idea of staging each action in such a way that it 'reads' well and communicates clearly. Several key drawings might be required to describe the sub-movements involved in even the most simple of actions - taking a pair of socks out of a drawer, for example. If we were to go straight from the first drawing of our character standing by the cupboard to the final position with socks in hand, the result would appear as if a pair of socks had just magically appeared in our hero’s hand. Obviously there is information missing which has to be seen by the audience to explain just how the socks got into the character’s hand.

Roll your mouse back and forth over the character above.

Consider the above information. The story may call for the character to get a pair of socks out of the drawer, but if these are the only poses we use, the effect is of the socks appearing out of thin air. We often need a number of key poses to adequately explain even the simplest of actions.

To tell the full story we need to break down this simple action into several steps. We need to see the character standing by the cupboard, reaching for the drawer, pulling open the drawer, dipping a hand in, and finally extracting the socks. Each of these poses, including squash and stretch, anticipations and any poses which use exaggeration, are treated as a separate ‘key pose.’
Roll you mouse onto the above image to see exactly how those socks got out of the drawer.

EXPRESSIVE POSES
Animation usually operates in the realm of caricature in which exaggeration becomes an important factor in order to capture the spirit of the action being depicted. Good strong key poses emphasise and communicate the intent of an action more efficiently than ill-considered ones. Put simply, strong keys lead to strong animation. It is therefore vital to spend time and thought working out the key poses until they do their job as expressively as possible as it will pay dividends as if these work well. "Limited" styles of animation are based on keys only, and this labour saving technique does not necessarily affect the audience's enjoyment of a piece.

Although these drawings are perfectly static, they are nevertheless highly expressive, possessing a dynamic quality that suggests action. Such poses are the beginning of strong animated sequences.

As animators work out the key poses of a particular sequence, they also find it helpful to consider whether or not the action works well if reduced to a silhouette. Staging the action of hands gesturing immediately in front of the body may not be as effective as staging this action in profile where the various shapes and forms can be seen in a way that does not rely on the challenge of drawing complex foreshortening. Poses should have both function - depicting the physical extreme of an action or setting up the character for an action to follow by loading its 'muscles', and impact - an expressive pose with a dynamic quality that implies what has gone before, what is about to come, and which registers and emphasises the inner emotional state of the character.
Animation is an illusion requiring the audience to suspend its disbelief. The audience can be absolutely engaged within the stories we tell and the world of characters that we create. However the illusion is a very delicate one, and alas, it is all too easy to remind the audience that they are merely looking at a series of drawings, a puppet, or a moving computer model.

To sustain this illusion, in a sense, we also have to infer the physical laws of our animated world in such a way that they are not in conflict with our day-to-day experience of natural laws we observe in the real world. These laws can be represented in an incidental way by how your character moves about its setting. Your key poses, therefore, should also show how the character carries its own weight - is one leg relaxed while the other supports the entire weight of its body? Is the body of the character under some physical strain from carrying, pushing or pulling a heavy object? Perhaps you need shift the character's weight off-centre to counter-balance the object it is carrying. What is its state of balance or indeed unbalance?
Consider the 'line of action', the main mass of the character and and what happens to these masses when your character propels itself from a resting position - there must be at least one firmly locked down a contact point with the ground (usually a foot) so that the forces involved in getting your character moving can be seen to pass through its body to this contact point making the action believable. The slippage of feet upon the ground at inappropriate times, is one sure way of shattering this illusion.

When learning how to animate for the first time, get up out of your chair and act out the action you are trying to represent. Feel where your limbs are space, what you muscles are using, the contact points you have with the stable environment, and how the weight of your body is being supported.

If your all your key poses are correctly thought out and timed, you will have no trouble in getting all your ideas across to an audience. Flick your key drawings from one to the next to ensure that the poses you have chosen work well together. It is usually only after all the key poses of a scene have been timed out on the exposure sheet and tested, that the animator or their assistant returns to add the ‘inbetween’ drawings.

In larger traditional animation studios, these numbered drawings are handed on to an assistant to further clean up and refine according to character model sheets. Once tested, an ‘inbetweener’ adds the required number of drawings between each key pose as prescribed by the animator’s dope sheets. A clean-up artist will tidy up all the drawings ready for tracing. In digital production, a computer software package can inbetween for you, but it does not follow that computer software understands how things move in the real world.

Key poses describe WHAT happens, but not necessarily HOW it happens.