23 February, 2010

Walk Cycles ~the Angry Animator

I've been watching the Animator's Survival DVDs and he has a few chapters on walks. If you talk to anyone in animation they will all tell you the same thing about walk cycles... they're really hard to perfect, but if you can pull off a good, convincing walk cycle, it speaks leaps and bounds about you, the Animator. They seem so basic and simple, but that's hardly the case. I found this on The Angry Animator's BLOG. It's probably the longest post yet, but it has some really good stuff in it. He also has a lot of really cool stuff on the blog, so go and check it out!!

_________________________________________________________________

animation tutorial-2 : walk cycle

Posted by dermot on November 1, 2008 at 12:07 am

Most sane people have a fear of animating walk cycles. Many events are happening at the same time, and it can seem overwhelming. A single mistake on your first drawing can wreck the rest of the scene. However, the process can be broken down into a series of steps which can go some distance in simplifying the process.

A walk cycle can be described by four distinct poses:

CONTACT, RECOIL, PASSING and HIGH-POINT.

These four poses and a handful of inbetween drawings constitute a walk cycle. The single most important frame of the four is the contact pose. Once you draw it you have already determined 80% of the rest of your walk. If you make a mistake on your contact pose, it can be very difficult to correct later on. Therefore: pay close attention now and save yourself a world of pain.

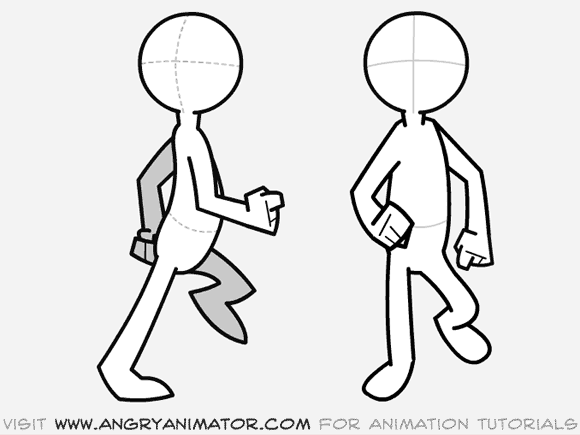
Here is the contact pose in front and side view.
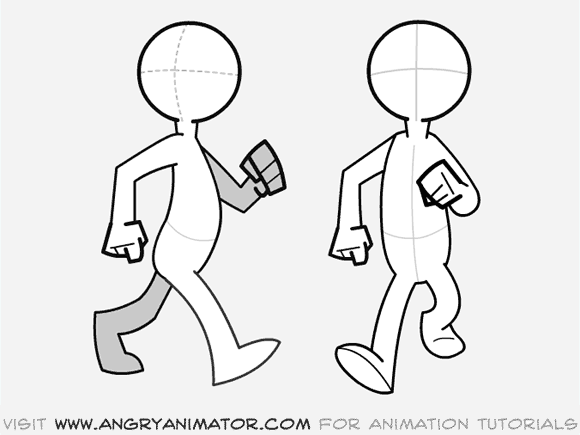
Look at the pose carefully. You will notice some very important details: The feet are at their furthest extension in the walk. That is their most extreme position in the cycle. That alone makes this the most critical pose in the sequence. You can plan an entire walk sequence just by laying out all the contact poses as they work into one another.

Some animators think that the recoil and high points are the most important poses because the head is at its highest and lowest positions. This is wrong. The contact pose is the fundamental building block of a walk cycle. If you do not start your cycle with this pose, then you are doomed. It’s as simple as that.

When the right foot is forward, the right arm is back, and vice versa. This is called “counterpose”. This is how nature keeps everything in balance when you move: one side of the body “opposes” the other. Good animation has these “opposing actions” all the time. If animation seems weak or unnatural to you, it is frequently because it lack opposing action. You can think of a walk as a series of “falls”. The character propels himself forward by leaning into the walk as he moves forward. His trailing foot constantly swings forward to catch himself before he moves on to the next “fall” in the sequence. It shares many attributes with the bouncing ball in tutorial 1. Look at the front on view.
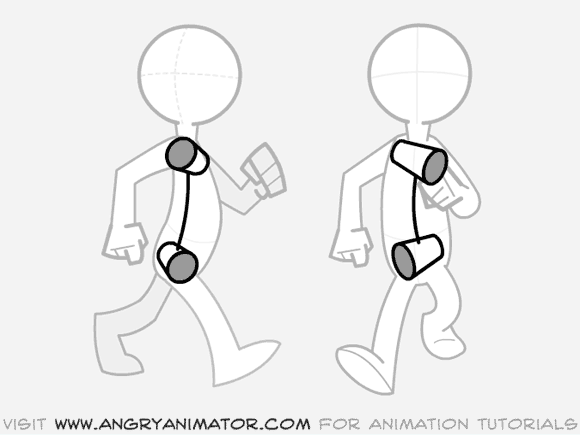
I have drawn in imaginary cylinders to illustrate the orientation of the shoulders and hips. Again, as one is thrust forward, the other is thrust back. As one tilts up, the other tilts down.
Another name for this is “Torque”. It is a fundamental principle of good posing. It should be an element of almost every figure drawing that you do. Michelangelo always used torque in his sculptures, creating dynamic poses, even in ones that were standing still. One hip takes the weight, while the other passively provides the balance.
The body is very rarely symmetrical: indeed, symmetry can be your enemy.

Now look at the recoil pose, the second main pose in the cycle.
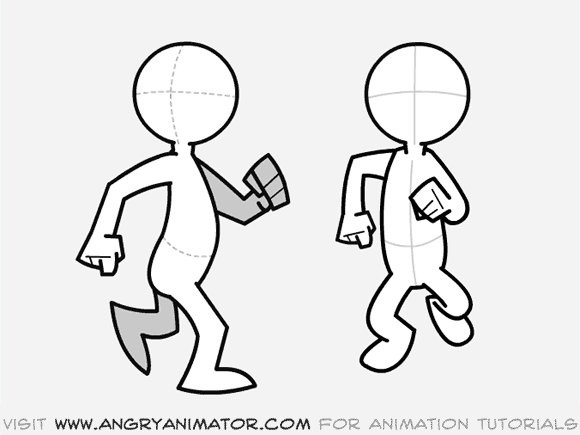
This is the frame where the character impacts the ground. It is also the lowest point in the cycle. The characters arms are furthest from the body as a result of the force of hitting the ground. The front foot is fully in contact with the ground; the rear foot has just lifted up from it.
Note that the leading foot is directly beneath the body, supporting the weight above it. Too many beginners produce recoil poses where the foot is not beneath the body, but several inches ahead of it. Try to avoid this.

To keep things simple, let’s skip the passing pose…it’s closer to being an inbetween. Let’s look at the high point.
This is the highest point in the cycle. The character’s body is stretched to the maximum as he lifts his leading leg forward to reach the next contact position. The heel of the trailing foot is just beginning to leave the ground.

Those are the three most important poses to remember when creating a walk animation. If you can wrap your head around them, you will have a much better chance of completing a satisfactory walk cycle.

There are two basic ways to animate a walk cycle. You can animate the cycle “in place” or across the screen. Here is the same scene shown in each style.

Why animate in place? There is one main advantage:

You only have to draw a single stepping cycle, then you can reposition it across the screen, saving time and paper.

The main disadvantages of animating in place:
1.It can be confusing.
2.The “arcs” on the character can look weird when the character is moved across the screen.
3.It can be difficult to match the character properly to the background, if he has to register to something on it.

I am going to show you how to animate a character walking across the page. Once you feel comfortable with that, an in-place walk cycle should be slightly less intimidating.

Let’s begin.

Look at this image:


This shows the keyframes of a walk cycle moving across the screen. The most important pose is the contact pose. Use this image as an overall guide to your scene.

1.Guideline.
On a clean sheet of paper, draw two parallel horizontal lines moving across the bottom of the page.
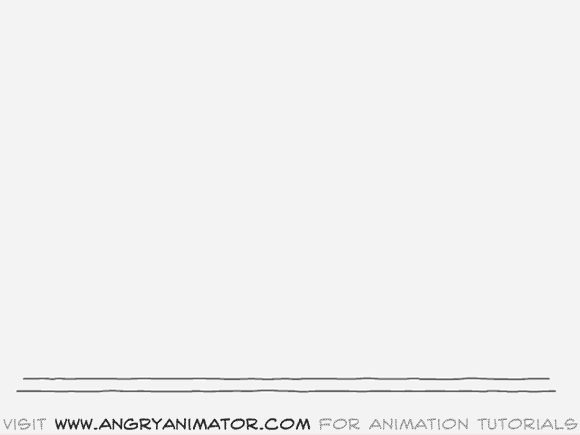

These are the lines that the feet will follow as they walk across the page. Without these lines to guide you, your character can drift either too high or too low on the page.

2.Draw the first contact pose.
Put a clean sheet of paper down over the guideline drawing. You are going to draw the first contact drawing.
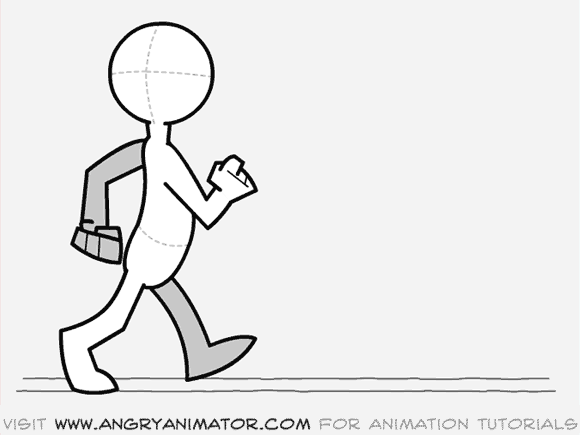

Position the heel of the right foot on the lower line; position the toes of the left foot on the upper line. Name this drawing #1, and since it is a contact pose I usually write the letter “c” in the top right of the page, above and away from the frame number. (This is a habit of mine, I don’t know if anyone else does it….you will find that it helps to reduce confusion when you have 12 drawings flying all over your drawing board.) Don’t forget to circle the drawing number, since it is a key.

3. Draw the second contact pose, drawing 7.
If you have a backlight then switch it on. Put down a clean sheet. Number it #7. Circle the number, as this is a key frame. Write the letter “C” above the frame number, to remind you that it’s a contact pose.

Note that the second contact pose occurs about half a second after the first. Here’s how you position the second contact relative to the first: The leading foot on #1 will be the trailing foot on #7. In this case the right foot is about to contact the ground on #1. In frames #1 through #7 it is going to hit the ground and more or less stay there. By frame #7 it will have begun to lift off the ground. Look at the picture below to see how #1 works into #7:
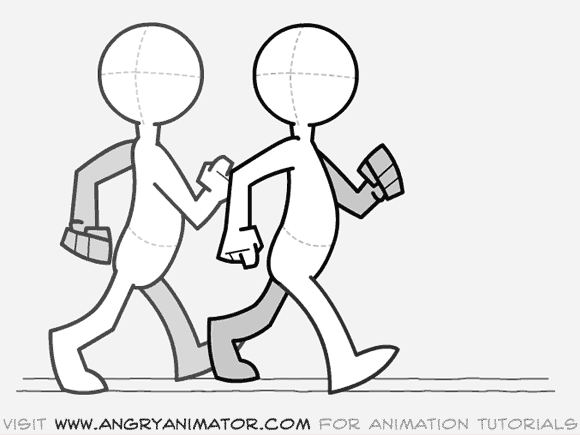

The right foot (the leading one) has touched the ground and the entire body has moved forward. The left foot (the far one) has now swung forward and is now about to contact the ground.
Lightly sketch it in, keeping the overall attitude as similar to #1 as possible. The only differences will be the arms, legs and orientation of the hips, all of which will be reversals of #1.
After you have roughly sketched in the second contact pose, you’ll have to check it against the first. Lift #7 off the pegs, and position it over #1. Flip #1 against #7 to see that both drawings have the same volume and attitude. You don’t want either to look bigger or smaller than the other. Also, both should be leaning forward into the walk at the same angle. If not, your walk will look more like a limp.

Now that you have drawn these two poses, you can begin to block in the main keys between them. First, an overview of what is going to happen.
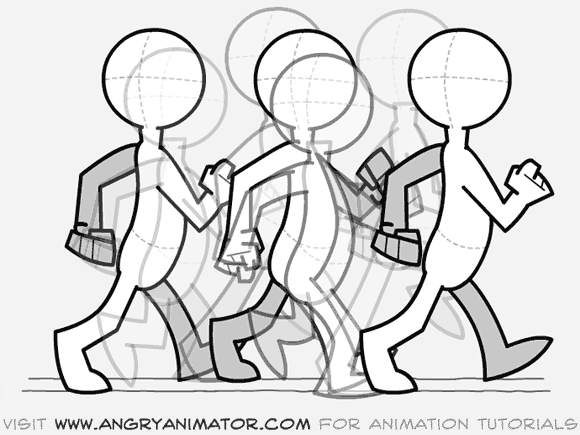
Here are the main keys. The contact, recoil and high point drawings. Remember these positions when you begin to draw them in on their own sheets of paper. If you were to positon #2 too high for example, it would make #5 very difficult to draw properly: the overall action would be too “tight”…not enough bounce in the walk.

This would feel like a very stiff cycle, unnatural for a cartoony character. See what I mean below:
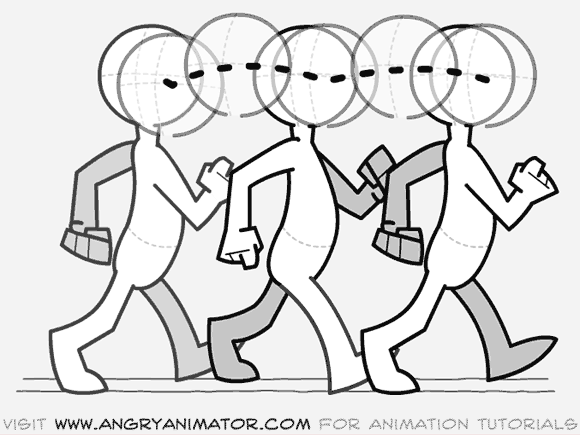
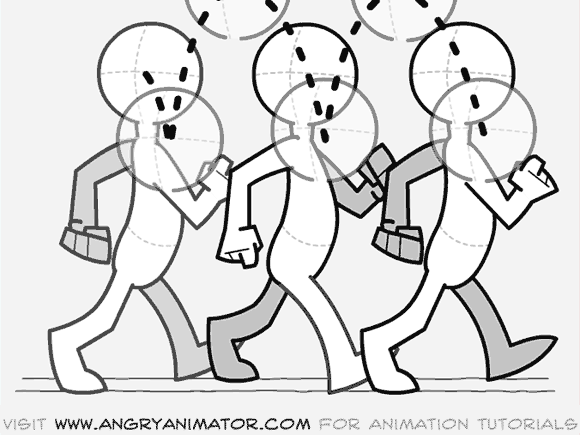
The opposite is also dangerous: moving the recoil too far down can result in a wildly exagerrated action, too unbelievable for all but the weirdest characters:
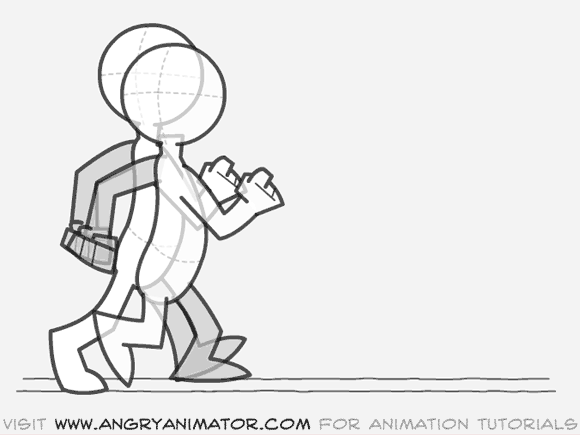
Just bear in mind that after the first contact, the character works down into the recoil, then up into the high point, then back into the next contact where the pattern is repeated:
4. Draw the recoil pose
(Bear in mind my rant in the previous paragraph). Put down a clean sheet, number it #2 in the top right of the page, write the letter “R” beside that, and draw the character as his foot hits the ground. The character will be at his lowest point in the cycle. Don’t move the head and body too far forward or you can inadvertently cause any number of arcing problems later on.
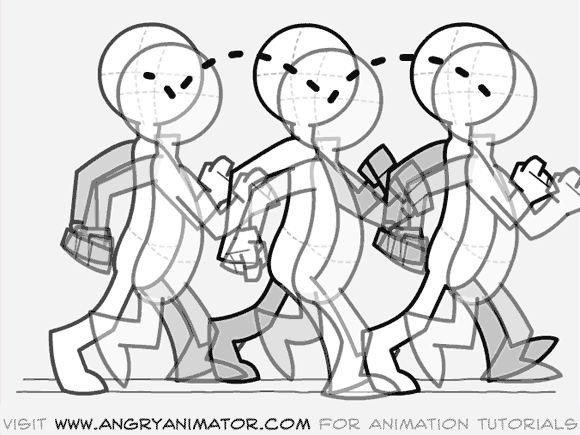
I find as a general rule of thumb that the body should fall by half a head to one head in height to keep the walk “bouncy” enough. (It’s a common beginner’s mistake to keep the figure at the same height throughout the entire walk.)

Remember…the recoil position will be almost identical later in the walk, on the subsequent step:
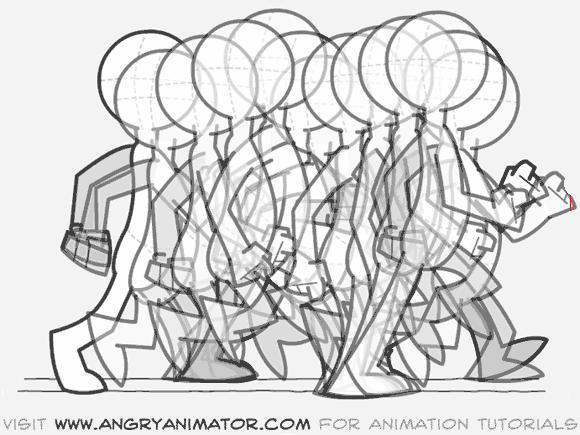
This is what will determine the overall arc pattern, and the positions of all the poses inbetween the recoil and the following contact pose. On the recoil pose the character impacts the ground. The rear foot lifts off, and the arms are extended to their maximum from the body because of the force of hitting the ground.

Now a brief note on the overall timing of a walk.

The most general type of walk cycle is completed over the course of one second. This means that the character makes a single step every half second. This is known as hitting beats, and luckily two beats a second is a typical musical pattern, or so I’m told. We’re animating this scene on the typical 12 frames per second, therefore the overall sequence of drawings so far will look like this:

#01:contact
#02:recoil
#03:
#04:
#05:
#06:
#07:contact (much like #1, but for the reversal of the legs and arms).
#08:recoil
#09:
#10:
#11:
#12:
#13:contact ( a duplicate of #1, only further to the right).

As you can see, a complete cycle works from #01 to #12, beginning its repeat on#13. I put the recoil immediately following the contact without an inbetween between them because an inbetween frame would make it look “mushy”. The contact should usually snap into the recoil immediately, without an intervening drawing.

I have not named the frame that the high point will go on. I could assign it as #4 #05 or #06. A different frame number will make quite a difference to the properties of the character. Here is why:

If #04 is the high point the walk will look like this:
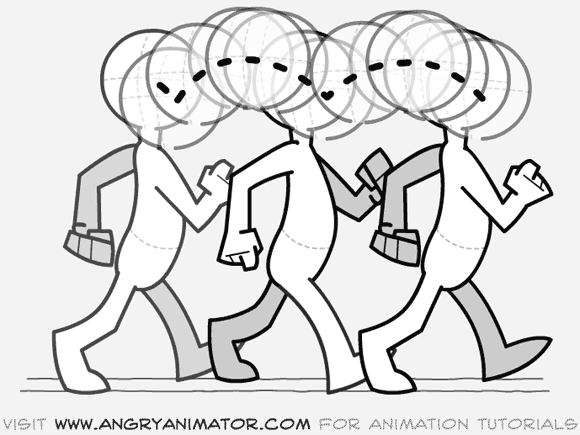
As you can see above, this makes the character “bounce off the ground very quickly, making him light footed.

If #06 is the high point the walk will look like this:
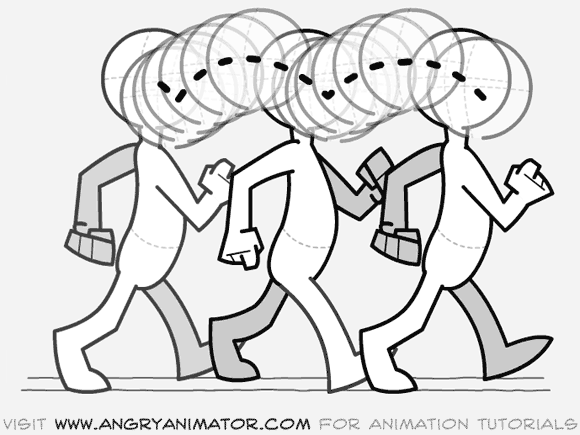
This timing above slows down the character as he rises from the recoil pose, making him seem a lot heavier.

I will take the middle path and name the high point #05, resulting in this:
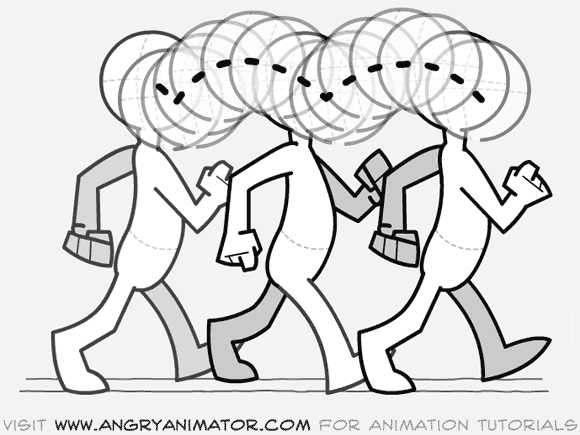

This is a more even timing: it should make the character seem like an average weight, without any extreme attributes. These are the kinds of decisions that you should make before you begin animating. Now we can look at our overall exposure sequence again:

#01:contact
#02:recoil
#03:
#04:
#05:high point.
#06:
#07:contact (much like #1, but for the reversal of the legs and arms).
#08:recoil (like #02, arms and legs reversed).
#09:
#10:
#11:high point. (like #05, arms and legs reversed).
#12:
#13:contact ( a duplicate of #1, only further to the right).

Now we have our 3 main key frames, #1 #2 and #5, and their near twins #7 #8 and #11. The empty spaces in the sequence above will all be inbetweens. Don’t worry about them yet.
For now we will focus on #1 thru # 07, finishing a single step.

5. Draw the high point.
Put down a clean sheet. As explained above, this will be drawing number #5. Write the number in the top right of the page. Circle it. Write a small letter “H” above the number. Now begin the drawing:

You have a little more freedom when drawing the limbs on the high point than on the recoil, as the leading foot is up in the air, and the arms are swinging over a pretty wide space. That gives you a number of different possibilities. The example frame that I have included is fairly typical.

The most important thing to get right with this drawing is the arc path of the head and body. A mistake on this one frame will effect all the inbetween frames around it.

Once that is finished, you are ready to move on.

6.Add the timing charts.

Before you do anything else, you should add the timing charts to describe the correct positions of the inbetweens. Here are the drawings we have finished so far:

#01:contact
#02:recoil
#03:
#04:
#05:high point.
#07:contact (much like #1, but for the reversal of the legs and arms).

Timing charts need to be added to #2 and #5. The timing chart on #2 will describe the positions of #3 and #4 as they work into #5. The chart on #5 will describe the position of #6.

Put #2 on the drawing board. Underneath the frame number in the top right corner of the page, you will add the chart. Here’s what it should look like:
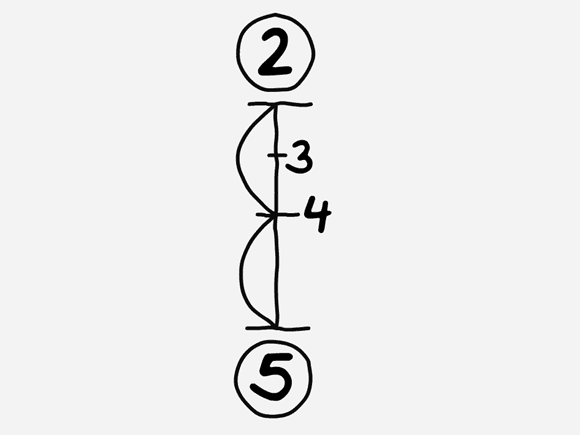
As you can see, #4 is the main inbetween halfway between the two keyframes. #3 is a smaller inbetween which will completely smooth out the motion.

The next timing chart to be added is on #5. Put #5 on the drawing board and write a timing chart beneath the drawing number in the top right corner of the page. It should look like this:
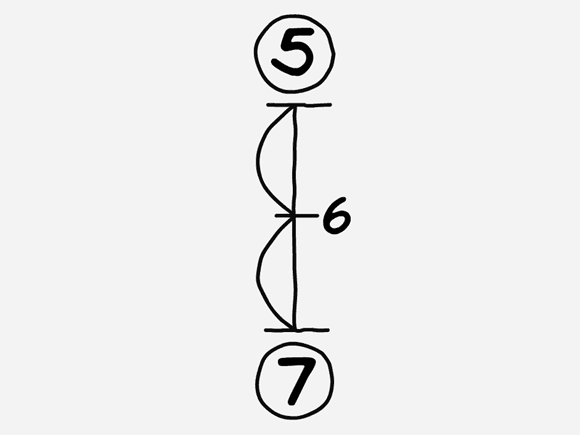
This shows that #6 will be a single inbetween halfway between #5 and #7. Now it’s time to draw the inbetweens.

7.Draw #4: the main inbetween.

Be sure that you have the guideline drawing on the drawing board.Put #2 on the pegs. Now put #5 above that. Put a clean sheet on top of all three. Switch on the backlight. Now you must draw #4, also known as the “passing position”. Some treat it as a key also, but to simplify things, I’m treating it as an inbetween. I’ve never really found it to be as critical as contact, recoil or high point poses.

You have to flip between #4 and the two key frames beneath it. You should remember that from the bouncing ball tutorial:
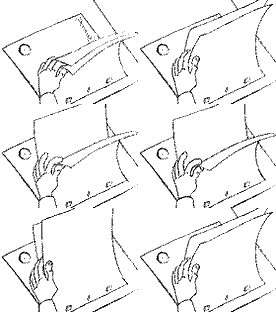
Again, be sure that your character follows the arc path as he walks. When you’re finished the drawing, remove the drawings from the pegs and place #2, #4 and #5 back on the pegs in that sequence. Now you can roll them to see if they move properly. You’ll also remember that from the bouncing ball tutorial.

If you see any errors in your inbetween, then you must lift the drawings off the pegs again, then place #2 on the bottom, #5 above it, and #4 on the top. Then you can flip again, correcting any errors that may have crept in. It’s tedious, but it’s the only way to do it.

8.Draw the remaining inbetweens.

Repeat step 7 with #3 and #6. If you do them right then you should be finished with the first half of the walk cycle. I hope you had fun, but I doubt it.

You should be looking at a stack of paper, numbered #1 through #7. If you put all those drawings on the pegs, you should be able to roll them and have a rough idea of what your scene will look like when it’s shot. If anything catches your eye, chances are it’s wrong. Go back in, repeating the process described in step 7, until you’re happy with it.

9.Finish the rest of the cycle (or else).

Repeat the steps above to complete the rest of the walk cycle. You’ll have to draw #13 (the third contact pose) to work into. Simply trace off the pose on #1 onto #13 in its new position, further to the right. If it took 2 inches to make a single step from #1 to#7, then slide #13 over 4 inches to the left and start tracing…

I hope that makes sense.

The second half of the walk is identical to the first, except that the arms and legs will be on the opposite sides of the body.

Indeed, you can refer to the first half of your scene to help you with the second. The recoil pose on #8 should be as similar to the recoil pose on #2 as possible, otherwise the walk may seem uneven, or even more like a limp.

10. A general note about arcs.

Every joint of the body has its own arc path. It’s a good idea to check them all. Here’s how.

Place all your drawings on the board. If you have a backlight switch it on. Pick a body part, e.g. the right wrist. Place a clean sheet over the drawings and draw a small dot on it at the position of the right wrist on frame 1. On the same sheet draw a dot for the position fof the wrist for #2…and so on.

By the time you’re finished you’ll have a sheet of paper that looks like this:

That’s what it looks like if it’s done properly. If you’ve made an arc mistake, it’ll look like this:

If your walk is to look smooth and natural, your arc paths must also be smooth, curved, natural shapes. You should repeat this process for every part of the body to make sure they all move properly.

If you’re new to this: draw simple cartoony characters at first. Don’t even think of attempting anatomical designs until you’ve gotten comfortable with the simple ones first.
That’s all for now!

16 February, 2010

The Frogumentary ~Disney

I saw this on YouTube. Eric Goldberg is an amazing animator at Disney... if you're an animator he's a household name... The part 3 video shows Eric drawing Louis (the Gator from Princess and the Frog), he was the Lead Animator on Louis. It's amazing to watch him draw and if you've seen the movie you'll agree that the animation on Louis was breathtaking! So fluid and organic feeling. Pure Awesomeness. These are filmed at the Walt Disney Studios. Part 4 talks about clean up, it's pretty cool.

He also has a book that I recommend to everyone either in animation or just starting out. It's called: Character Animation Crash Course.
____________________________________________________________


15 February, 2010

A Clean Start ~ Eric Scheur

I found this little nugget on the 11 Second Club. I know that I've been posting a lot of notes about planning.. this sort of falls under that category, but more along the lines of file management/organization. I really thought I was organized before my current job; I wasn't. File organization is HUGE... especially if you're working on something as big as your own short film. Making sure that you name your files correctly, incrementally saving and probably most importantly BACK UP YOUR WORK, daily to an external hard drive, then I usually do weekly backups to a DVD and store in a fire proof safe, but that's a whole other discussion for further down the road... I digress, back to file management. Here are some folders that I personally use to better keep track of: video reference, renders, texture maps, characters (untouched), scenes, audio, uploads and movies. I usually have between 10 and 20 folders organized for every animation I do. It makes my life a lot easier, especially months down the road if I have to come back to the animation, whether it be to polish something up or adding to the animation! Once you're ready to get into the computer he also talks about organizing your workspace in whatever software package that you're using. This too makes life so much easier. If you're just getting into animation you're going to need a pretty 'beefy' computer, but one thing that I recommend are getting dual monitors, I don't know how I managed prior to having them. Monitors have come way down in price and it will be a wise investment (trust me). 22 inch wide screen should do the trick but 24 inch monitors are sweet!

Thanks a ton Eric, great post.
_________________________________________________________________

A Clean Start

By: Eric Scheur

Published August 28th, 2009

It's time to talk about one of my favorite subjects: Getting Organized.

There's this notion out there that "creative people" and "organized people" are made from very different building blocks. You can't be creative if you're restricted to specific boundaries and procedures. You can't organize a creative process that needs to be free to move as new ideas and fanciful little whims present themselves. Right? Wrong! (of course)

While there are artists who feel comfortable and at ease in a kind of "fog of creativity" (papers lying all over the place, unwashed clothes on the floor, seven empty cans of Red Bull scattered around the computer desk), there are just as many who find that a little structure can help them focus their mental attentions on all of the creative stuff since they know that other technical and outer-worldly concerns are straightened away and taken care of. Whether you're the former or the latter, or somewhere in between, you may find some of the following can help you put some order into your workflow. Ideally, these are things that should be done before you've animated a single frame, or drawn a single thumbnail. This will set the stage for the month of work you have ahead of you.

A quick note: All of the following is my own personal preference and you are encouraged to find a system that works for you. Feel free to deviate from my suggestions, or invent your own system. My hope is to inspire you see how a few small preparations in the beginning can save massive headaches later on.

Ready? Let's dive in!


Folder Structure

It's been my experience that most animators who work alone keep their files clustered together in a general animation folder, or sometimes straight out on the desktop. I used to work that way, too, and I remember the convenience of having everything all in one place. That is, it was convenient in the beginning. Once I had a few versions of a scene or several different walk cycle attempts, that one folder become more and more difficult to navigate. Plus, if I ever moved stuff around on my desktop, or placed one folder inside another, or renamed something somewhere, I'd encounter all sorts of error messages about missing files, references that couldn't be found, and audio files that no longer matched what my software was expecting.

My eyes were really opened up once I began working in a commercial studio, where animators access their files from a server that also supplies files to the modelers, TD's, riggers, and texture artists. It was no longer acceptable to name my files whatever I felt like at the moment ("trying_that_middle_part_again.mb" wouldn't cut it), or to make a new random folder ("new animation" doesn't quite work because a week from now, the name has lost its meaning). Folder Structure and File Naming Conventions were integral to a job moving forward efficiently.

Of course your home computer doesn't require a system as sophisticated as a fully-functioning studio, but you'd be surprised just how far a little organization can take you.

As an example, we'll pretend that we're going to animate a piece for the 11 Second Club. (I know it's a crazy example)

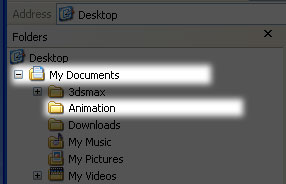
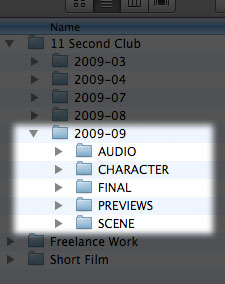
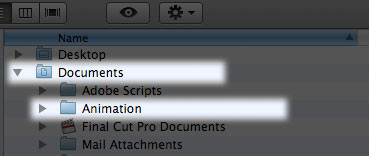
First, we're going to need a permanent and reliable place for our projects to live on our machine. Whether you're using Windows or OSX, your system has provided you with a "My Documents" or "Documents" folder (respectively). I recommend creating a sub-folder from here, and naming it "Animation."

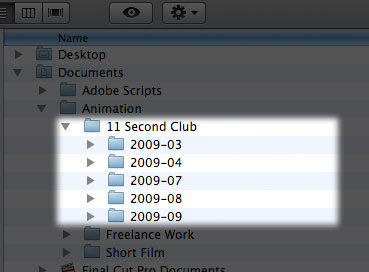
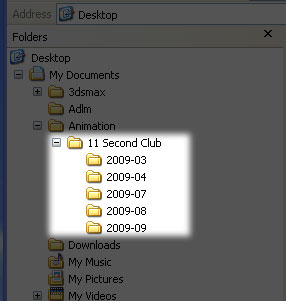
This is where all of your animation files will live from now on. If you'd like, you could even create another sub-folder called "11 Second Club," to distinguish your 11SC work from work you do for business, school, practice, or personal projects.

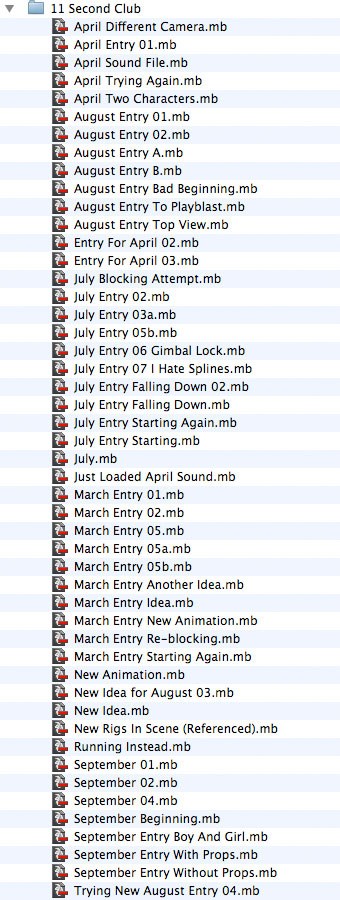
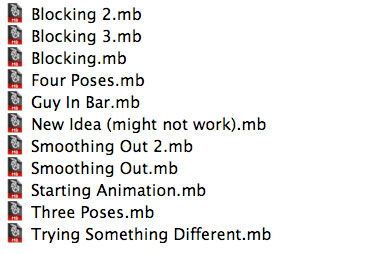
You can see that I've also divided my 11SC Folder into the different monthly competitions I have worked on. This may start to look over-organized, but after only a few months I find it much better than having just one folder that looks like this:

I mean, think of how long it takes to scan through those names in an "Open File" dialog before you find what you're looking for.

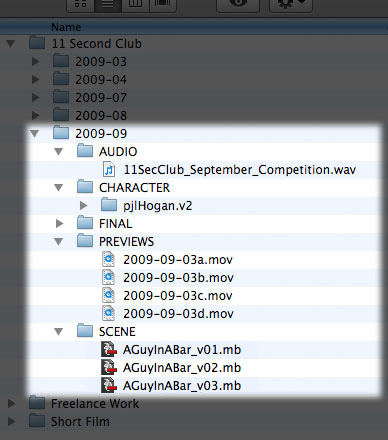
Now it's time to actually set up the folders for our project. If you're using Maya, you can use Maya's "Project > New Project" menu to automatically create a set of folders for yourself. If you're working with a different 3D Package, or working in 2D or stop-motion, it might be nice to set up your own folder structure. Here is a basic 3D setup that I recommend:

  • AUDIO - Once you download this month's audio file, place it in here.
  • CHARACTER - This will be the rig file that you use for the piece.
  • SCENE - This is where all of the versions of your scene are stored
  • FINAL - This is the File you submit. It will only ever have one file in it, and that will happen at the very end of the project
  • PREVIEWS - This folder will hold your playblasts and previews that you make. These will probably also be files that you choose to upload to the Works In Progress Forum

    That should be enough to get us started. Depending on your needs, you may also like to create folders for RENDERS, POP-THROUGHS, REFERENCE, CHARACTER DESIGNS, THUMBNAILS, etc. The important thing is that we have all of these folders and files inside our one main project folder, which is inside our 11 Second Club folder, which is inside our Animation folder.


    Naming Conventions

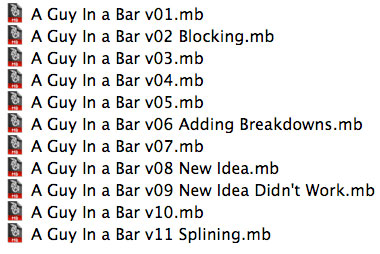
    Before moving on, I want to talk about File Naming Conventions. That's a fancy way of saying "Call your files something that makes sense." You will almost always want to be able to tell, at a glance, which is the newest file. A good naming convention can also help you track your progress backward through a project in case you decide to make some changes to an earlier file. The easiest way to accomplish this is to choose one file name and save numbered versions of it as often as you'd like. For example, let's say we want to call our file:

    The name indicates what will be going on the scene (there will be a guy, and he will be in a bar--natch), but to really prepare this file for the production process, let's modify it just a little:

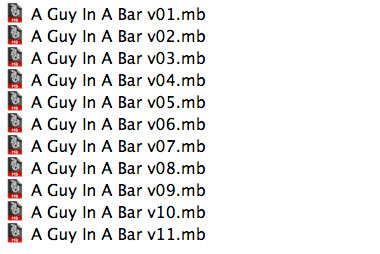
    Ah ha! That's more like it! I can now start saving versions of this file for as long as I'd like, and the computer will keep them organized for me. Weeks from now, instead of looking like this:

    My folder will look nice and clean, like this:

    I know what you're going to say: "But Eric! With that new filename system, I can't tell what changeshave occurred in each file. The good thing about the previous method is that it was like taking notes on what stage I was at. I could tell whether I was still blocking the scene, or starting to smooth the first twenty frames, or adding eye darts. You've taken that away from me."

    Oh, but hear me out, doubting animator. There is nothing preventing you from adding extra words after the version number if you'd like to. Like this:

    The value of doing things this way is that you not only get those little reminders to yourself about what stage of animation you're at along the way, but the files are still nice and neat in chronological order because of the way the computer keeps things alphabetized. What's more, you can almost get a sense of your workflow when you look back at those notes later on. As long as you keep those the same string of letters and numbers at the head of the filename, everything is is automatically taken care of for you.

    Note to Maya users: Maya allows you to save your scene files as either .mb (Maya Binary) or .ma (Maya ASCII) file types. .mb files are the default, and help keep file sizes small. However, you may want to consider using .ma files, which can be opened in a text editor to locate and troubleshoot any technical problems that might crop up. Many studios prefer using .ma files for this very reason.


    The First File

    Once all of our assets (our audio file, our rig file, any props we'll be using) are safely organized into their appropriate folders, it is time to create our first scene file. Our Version 01. Whether we decide to import,merge, or reference (techniques which are beyond the scope of this article) objects and characters into our scene, the important thing is to start clean. Our Version 01 file should have all of the pieces in place, but no poses on the character and no keyframes on anything else. This way, we will always have an untouched version of our scene should anything unthinkable happen during the course of the month. There will always be this file to come back to.

    Once Version 01 has been saved, we can save Version 02 of our file and really get to work!

    But we're not ready to animate just yet. There are a few small tasks to take care of before we can finally put all of this preparation work out of our minds.


    Just Five More Steps

  • 1. Make sure you're working at the proper framerate. You'd be surprised how often animators get into working on their scenes only to learn that they've been animating at 30fps when they had intended to animate at 24fps. Changing these settings at a latter point can shift your keyframes in unexpected ways, often placing them between whole frames (on frame 15.72 instead of frame 16, for example). Instead of dealing with this headache later on, let's just confirm that we're working at 24fps right now.

    Note: The 11 Second Club has no rules about what frame rate its entrants must work at. You may work at 24fps, 30fps, 25fps, 12fps, etc. Ideally, however, you will choose your frame rate at the beginning of your project and not change it down the road.

  • 2. Set the timeline to the appropriate number of frames. It's good to have a sense of how long your shot is before you begin to animate. With the audio at the 11 Second Club, you are likely to have a scene that is around 260 frames (24fps) or 330 frames (30 fps). Just as we did in step 1, let's set this frame range now so we don't have to think about it later on.

    Note: You may find yourself changing the timeline quite often as you work (especially if you follow the advice in Jason Schleifer's Helpful Hint), but it is always good to keep in mind the full number of frames you'll be rendering out or making a preview of at the end of the month.

  • 3. Create a Select All Button/Selection Set for your character's controls. Whatever software package you're animating in, it is useful to have a few shortcuts when it comes to selecting controls on your character's body. Whether it's a button to select all of the joints on one hand or a drop-down menu to select only the IK feet and hips, most 3D programs allow you the ability to create these custom selection sets. One of the most frequent sets I use is one that selects the controls for the entire character--this way I can be sure I am setting a key on every control for a single frame. This key-every-control workflow can come in handy when timing out your poses, and adding breakdowns, anticipations, and follow-throughs. Once you've created a Select All Controls button, you'll wonder how you ever lived without it.

  • 4. Use your new Select All Controls button to set a key on your character in its default pose at frame 0. Chances are very likely that at some point in your animation you are going to come to a point where your character's joints are rotated into positions that you had never intended and you can't seem to figure out a way to get it all untangled. But if you have the character's default pose already saved somewhere in your scene, all you need to do is copy that pose (or just the pose on specific body parts) to your trouble-spot and let the untangling begin! Make sure your timeline begins at Frame 1, but always know that Frame 0 holds that special pose, already keyed, waiting to help you out when you need it most.

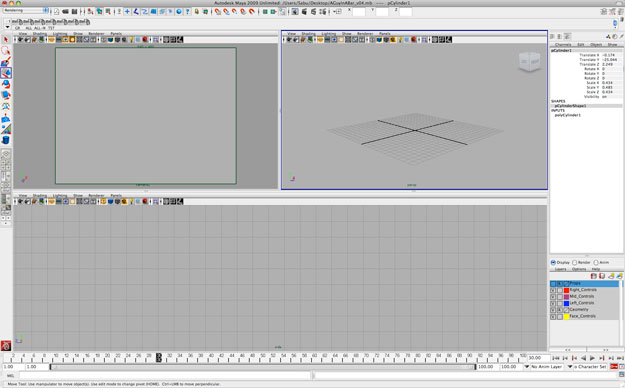
  • 5. Set up your viewports. This is the final step before animating, and to me it always feels like setting up my own private workspace. 3D Software packages allow you to view your animation from any angle at all, and from multiple angles on the screen at one time. The trick is to be able to take advantage of the viewports and not leave any part of the screen unused. I'll show you the way I usually set up my screen and explain why I like to work this way, but please experiment and find what works for you.

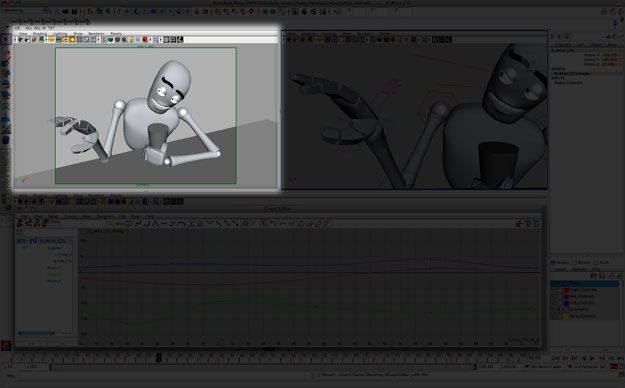
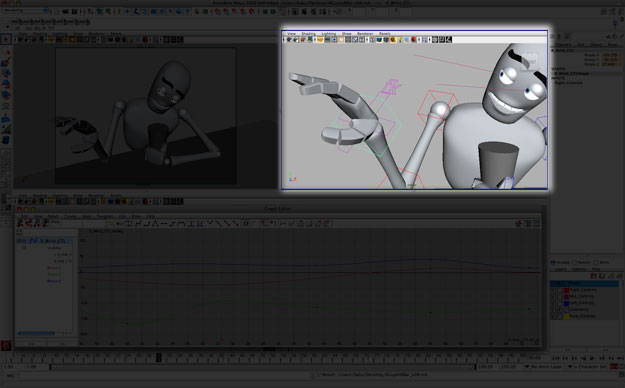
    This is the screen configuration I use 98% of the time:

    In the first pane, I keep my camera view. I lock my camera so that this view never changes. I turn on this viewport's Safe Frames (or Resolution Gate) so that I know the ratio of my final output, and what will appear on screen. Once this is all set up I will always have this pane to refer to while I'm animating, and I will be able to 'animate to the camera' with certainty every step of the way. If possible, I will turn off the visual display of all controls and any other non-character elements in this viewport so I will have as close a representation of my final render as possible.

    The second pane is where I do most of my actual animation. I keep this pane in Perspective mode most of the time. This allows me the ability to rotate around a character, zoom in close, select what I need, move and rotate body parts as I please, all without disturbing the camera view. Occasionally I will turn this pane into a Top, Left, or other orthographic view, but for the most part I stay in Perspective and it is all I need to navigate around, select controls, and manipulate my character.

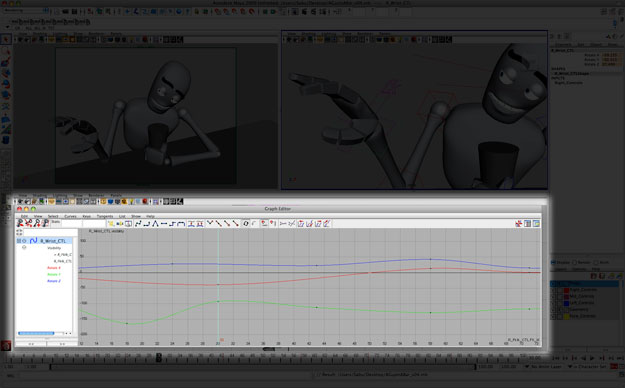
    The bottom pane is one long stretch of screen real estate that tends to stay unused while I am blocking--although it can be useful to have a long Side Orthographic view if your character is walking, for example. Where this part of my screen really start to get useful is when it comes time to deal with the Graph Editor. With this long space, I have enough room that I don't have to worry about the Graph Editor edging over into space I need for my Perspective and Camera views, and I have the perfect stage to look at my curves (which I believe are most intuitive in a lengthwise view).

    Again, this is merely the way I am most comfortable working. I have seen different screen configurations with almost every single animator I've watched, and everyone seems to have their own reasons for why they like their screenspace set up a particular way. The key is that they do have a reason for working the way they do instead of just using the default layout that the software presents them with out of the box. Experiment and think about what works best for you, and make sure your viewports are set up in a way that will be most productive for you.


    And now, with all of this organization finally behind us, we are ready to tackle our new animation scene. So let's get to it, eh? There's only so long before the deadline at the end of this month. See you there!

    - Eric

  • 12 February, 2010

    Work Flow ~Jeff Gabor

    This is a post from Jeff Gabor talking about work flow and the importance of consistency when animating. I refer back to this usually when I'm starting a new animation (but, I think it's invaluable). Coming up with your own unique work flow is one of the most time consuming parts of learning animation, it takes so much time (a little guidance) and a lot of falling and getting back up to get your own flow down. But once you do, your animation will go so much smoother and you'll be much more efficient. A thousand thank yous Mr. Gabor!
    ____________________________________________________________________
    Here's a workflow outline I did for a few of the animators at Blue Sky a couple years ago:

    I go through a very consistent pattern in going through a shot.

    Watch, Listen, Think and Ask, Act, Record, Edit, Block, Spline, Polish. (WLTAAREBSP for short)

    Watch -

        • Watching the boards several times trying to note the work others have done is always my first step.

    Listen -
        • I love to loop the audio several times just to make sure I can hear each beat or clue.
    Think and Ask -
        • For dialogue I listen to the beats, note the ups and downs, apply emotions and intent to the tone of the voices, and if there is time I love to involve set pieces or props.
        • Action shots are a bit different. To me action shots are begging to be unique. I ask myself what “new” thing can I add or combine? What action would surprise the audience? This is where asking fellow animator's is most useful.
    Act -
        • Once I have a group of thoughts or ideas it's mirror time!
        • My first acting attempts I try to leave loose and natural and let new quirks or gestures come in randomly.
        • I'll take note of the changes and write down each of the quirks.
        • Eventually, I'll make a tree branch of different scenarios for the acting choices.
    Record -
        • I don't think there has been a shot yet where I didn't pull out the camera for something.
        • My drawings don't show me poses very well, so I work them out on camera and then caricature them in 3D. I use thumbnails specifically for broad actions.
        • For action shots or tasks that have delicate movement that I just can't seem to remember how to do them in real time, I'll act it out in slow motion and speed it up later.
    Edit -
        • I capture the material in Premiere and layout the selected takes, and one by one weed out clips 'til I have single good clip.
        • If there are parts from one clip I like over another I'll edit the two together, but the idea is to get a single reference clip to export so my idea is concrete.
        • For action shots I almost always speed up my reference, at least a bit.
    Blocking -
        • I use my reference to pick out all the main storytelling poses and do my best to run through the entire animation without any detail work.
        • I ask myself several question in order to know how to precede.
          • What's the attention on?
          • What's driving what?
          • How much time do I have?
        • I start by blocking out the main character or speaker, but in the case of extreme object dependent shots (ie. Scrat Flipping shots) Objects take precedence over characters.
        • For the flipping or vaulting sequences I did, I found it far easier to work out all the beats animating the driving object first. Not just blocking it, but going straight to splining it.
      • I often find it easier to work out timing ahead of poses. Sometimes I'll have a bouncing ball or square animated and fully splined to determine my timing before heading to my character's poses.
      • The “how much time do a I have” basically tells me how much blocking I can afford to hide before showing a supervisor. If I can get a way with it, I'll hide my blocking work until I have got through the entire animation once, then go back to add 1-3 breakdowns per key frame to demonstrate the movement.
        • Conscious Blocking
          • When I block I'm very conscious of how this will spline. I add my keys for holds that sups won't see but will be notes to me on how long poses hold.
          • ex. I have a pose at 101 and new one at 130. I know I want 101 to hold until 125, so in blocking I'll take the time to put that key down now so I won't forget during splining.
        • OverBlocking
          • Thanks to Hans' Vulture work on IA2, I now “over-block” my shots. I generally make it a rule to have a new pose fully worked out every 3-5 frames during motions.
          • The idea is that there isn't a single un-answered question or confusing part about the motion to be “explored” in splining.
        • Facial Blocking
          • I feel like to sell a shot to a director over blocking the dialogue helps a ton. While talking I usually make a new facial pose every 5 frames and add one inbetween afterwards. I like the toolbox but never just plug and play.
        • Hitting Early
          • I usually like to see how early I can hit a shape before it actually makes the sound when doing dialogue. I love it when a sup says, “I think you may be too early on that shape,” as opposed to, “it's hitting late.”
    Splining-Ahhhh, sleepy time. If I did my blocking right I get to turn my movie up and turn off my brain. Specifically, I work 15-30 frames at a time starting from the beginning. I work from the inside of the body out. Hips, Spine, Legs, Head, Arms, Toes/Fingers, and then face.
          • I rarely actually grab tangents and move them around any more. I simply grab keys and hit my short-cut for autotan/autoconv to set up all my moving holds and eases.
    Polish-This usually means asking fellow animator's what I could to do to finish up the shot. By this time I've lost my eye for the actual motion so I'll often flip my flipper horizontally to check my motion but I do this sparingly so I don't get used to the flipped image as well. I almost never leave a flipped image looping cause I loose my eye for it quickly.

    11 February, 2010

    Watch the Eyes ~Cameron Fielding

    I found this on Cameron Fielding's blog FLIP... Talking about the importance of eyes. A handy-dandy post if I do say so myself!! Cameron is currently working at DreamWorks but he has worked at numerous studios around the world! Thanks Mr. Fielding.
    ______________________________________________________________

    Just going to post this up quick. Something I've though about before when I'm animating something is how we animators have a kind of 'wide eye' for the shot were working on... like we can see the whole frame in our vision and judge the motion within it, rather than just concentrate on whats deemed as 'important'. Its like when we watch our motion back on the playblast - we tend to watch the whole character, by looking at their `average point`, because we're trying to see how everything works together as a whole, as well as concentrating on the specific part we just changed... its as if were trying to look at every little detail all at once.

    When you learn about animation you find over and over being told how important the character's eyes are to the performance, and its equally true to remember how the audience will spend all of their time almost exclusively looking at the character's eyes. For me personally, its kind of odd how much I don't think of this when im animating... I tend to concentrate so closely on the eyes that I forget to watch how they fit with the rest of the body... either that or I'm looking at the shot 'wide eyed' and not seeing the details...


    I think a good approach is for an animator to look right into the characters eyes when running playblasts. In fact, I think it would work too to look into the eyes of your character while posing - even if your posing the hand or foot, you can get the overall "shape" of it by looking in the eyes, then afterwards looking at that specific part and posing the details. Same too maybe if were animating the hand of our character, look in the eyes as you watch the playblast and see how the motion reads there, rather than just staring at the hand, or staring at the shot 'wide'.

    Video Reference ~ Kevin Koch

    I wanted post something in regards to video reference. When you're starting to work on your next animation, first you want to brainstorm, sketch out some thumbnails, etc. But before you start animating getting good video reference is a crucial point in the planning stages. Good video reference means that your thumbnailing, notes and planning (I know I have a ton of posts referring to planning, it's important and it's definitely one thing that I'm trying to improve on) will make your life in the computer that much easier... this is only part of the article so if you want to read more CLICK HERE.

    I found this on SyncroLux, a blog by Kevin Koch who is at Warner Bros. and a Mentor at Animation Mentor. Really good stuff, thanks for sharing Mr. Koch.
    _________________________________________________________________

    In a sense, video reference isn’t any different than using reference like Muybridge, or finding a great clip of animal action on a nature show. On the other hand, if you can’t work out of your own head, then you’re going to be limited to what you personally can act out. Then a tool becomes a straight jacket.

    Here are the few tips I have for effectively doing video reference. First, if you’re too shy, you should probably not bother. I used to be so inhibited that I could only shoot reference if no one else was around, and even then it was crummy reference. It took animating at a 10-20 seconds/week pace, in a studio with nothing but open cubicles, to get me over most of my inhibitions.

    Second, make it super simple. If your production allows a webcam and appropriate software on your computer, great. If not, consider a notebook computer with a webcam or a digital camcorder. If the process is simple enough, you won’t get precious with the process. I found when I had to go to a production coordinator to get the key to get into the dedicated video room, and when I was done filming then had to spend several minutes encoding the video and transferring it to my computer, I tended just skip the whole process. It needs to be as easy as standing up from your chair and acting things out, as we do all the time, whether we’re shooting reference or not.

    Third, grab a friend or two if they’re likely to be better actors or better at a certain behavior. Know your limitations. If you really, really can’t act, then you’re risking a garbage-in/garbage-out scenario.

    Forth, I find it necessary to trick myself, by planning to do 4 or 5 consecutive takes in rapid succession. I figure that by the third or fourth take, I’ll be relaxed and natural. Ironically, I usually find that my first take is the best, but if I try to do it in one take I always over-think, or tighten up. And if the first passes aren’t any good, delete the file and start over. There’s also nothing to stop you from editing parts of different takes together.

    Fifth, use props. Jeff does a nice job of that. I find I need to set up ‘prop heads’ if I want to appear to look at other characters. If I don’t set up a fake head or two, I have to consciously think about where to direct my gaze, which kills my meager acting. Set things up to be as natural as possible.

    Finally, I actually prefer the low resolution and low frame rate of a cheap webcam. For me video reference works best when I’m using it to get the basic gesture and timing of the movement. I know I’ll need to exaggerate, and I find it easier to exaggerate from a fuzzy image where everything isn’t perfectly clear (just remember to convert everything to 24 fps!). The exception is closeup facial shots, where I make sure the lighting is decent to get as good an image as possible.

    In those close-up scenes, I try to be ‘in the moment’ (which is frankly something you can’t really try to do, but you know what I mean) and let the chips fall where they may. If I focus on saying and feeling the dialog, I tend to get a fairly natural performance in the eyes and brows. If I think about facial expressions, it all becomes contrived. It’s important to know the dialog cold, and to know just where the accents are and what kind of emotional tone the voice actor used. It’s also crucial to actually say the line out loud, and not try to lip-sync it, or your facial performance will be hesitant and restrained.

    Happy filming.

    10 February, 2010

    3 Speeds ~Victor Navone

    From Victor Navone's Blog, a really good article about the phrasing in your animation. Mixing up the tempo so not everything is hitting on the same beat. This really adds to the appeal/entertainment of your animation.
    ___________________________________________________________

    3 Speeds

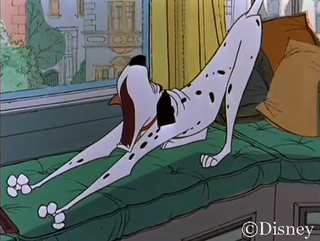
    Something I heard back when I was first learning animation that still really helps me to this day: always try to get three speeds in your shot. Put in slow moves, medium moves, and fast moves. This will help give your shot texture, interest, and emphasis. If you can have different parts of the body moving at different speeds, even better! Take a look at this clip from 101 Dalmatians. This animation is beautiful in many ways, all of which I wont go into here, but pay particular attention to the timing of the actions. Pongo is sleepy, so naturally there are lots of slow movements. But there are also faster moves for emphasis, such as the ear scratch, the collapse at the end where he lets gravity take over, or the high frequency shaking during the stretch. Not only are there three different speeds of animation, but some of these speeds are happening simultaneously. Another example would be to have a character shaking his head as he raises his arms up slowly in anticipation of a gesture. The more variation you can add to your timing, the better. I see a lot of student work where the characters are always moving in a "snappy" fashion. This is fun to watch for a while, but soon the timing becomes boring because there is no contrast. So don't forget to shift gears!

    Creating Good Poses ~Keith Lango

    Here's a couple of tutorials from Keith Lango's YouTube page. He goes into some good stuff about posing, line of action, balance and getting your characters to have life and emotion. You should definitely watch them if you're about to start working on a new animation!! Really helpful stuff, thanks Mr. Lango.
    ______________________________________________________


    Demo Reel Tidbits

    I found these on the Tips and Tricks Volume 2 eBook HERE. Since I'm in the middle of looking for a studio that wants me I figured that this would be a useful post to refer back to. Having completed my demo reel, seeing my fellow students work/reels, and seeing the quality of animation that the big studios are producing there's so much more than just animation to get into your dream job studio. I want this post to focus on the non-animation aspect of animation. The first article is from Keith Sintay talking about the importance of music on a reel. A lot of people say that you shouldn't put music on your reels... but if you look around the Internet at various studios from around the world 99% of them all have music playing on their reels... so it's a personal call, obviously you don't want to use extreme music, common sense will go a long way.. but enough about what I think, let's see what Mr. Sintay says..
    The second post is from Carlos Baeana's Website talking about demo reel dos and don'ts.
    ___________________________________________________________________________________

    How Important Is Music on a Demo Reel?
    By Keith Sintay

    Demo reels can be tricky things. Everything about what we do as artists is subjective; not everything you do will please everyone. And, putting together a demo reel not only involves your visual elements, but the auditory ones as well. I never used to be a fan of music on a demo reel. I was happy just letting my dialogue shots (and any incidental music that might be behind the dialogue) carry the sound portion of my reel. I had seen too many demo reels with, what I felt, was ‘cheesy’ music that didn’t help the flow of the reel at all, but rather hindered it. So, I figured, it’s just safer to leave the music off. Well for anyone that may have seen my reel lately, you will notice that I finally made the leap and put music on my reel. What changed my mind? Well, I was looking at my reel, and because of the length and variety of shots contained on it, I didn’t feel like it flowed as nicely as it did when it was shorter and I had only animated a few things. I looked at my colleague’s reels and saw how proper music can tie together your shots. Now again, this is all subjective, but I tried to pick music that was upbeat and not overly distracting to the animation, and above all that didn’t drown out my dialogue shots I think music on a demo (show) reel is a matter of taste. I am not an expert in this field, but from what I have seen in my professional experience, bad music can take away from great animation, and good music can help disjointed shots flow together seamlessly (like in movie trailers for example). I would simply ask around and find out if your friends or colleagues like the music you have selected. Get some feedback and then use that to help you make your decision.

    Keith Sintay

    ++++++++++++++++++++++++++++++++++++++++++++++++++++++++++++++++

    Demo Reel Dos and Don’ts
    By Carlos Baena

    Throughout my animation career at different studios and as a cofounder/director of sorts at Animation Mentor, I’ve watched many student and industry demo reels. I have also gathered information and spoken with recruiters, animators and supervisors about
    how they select candidates based on the work they see in a demo reel and their interactions with the job applicants. For you, I’ve created a list of valuable tips for creating an animation demo reel that has a better chance of landing you a job at the studio you’d like to work at. Also I recommend reviewing my webinar from July 9, 2008, called Demo Reels Dos and Don’ts which you can watch at Animation Mentor.com.

    Go to www.animationmentor.com/webinar and click on the Past Webinars tab. Also, check my blog www.carlosbaena.com for more information, tips, and ideas as I continue to learn and share more about animation.

    1. Do NOT try to make a one-size fits all demo reel. This works in small companies, but for the main studios it may hurt your chances more than anything else. Make your demo reel specific to the position and studio for which you are applying. When applying, as an animator to a big animation studio where departments are very specialized, everything
    on the reel should be specifically “animation,” not “texturing,” “lighting” or “modeling”.

    2. You should NOT include everything you’ve worked on throughout the years. Keep it short. Remember that recruiters/supervisors only have a short time to look at reels and want
    to get to the point right away. It should be no longer than a minute or so. Chances are that people who are reviewing your reel are looking at another 100. So, the easier you can make it
    for them, the better. You don’t want to bore them. Instead, they should see your strongest work (even if it’s only 30 seconds). Leave them wanting more. Here’s another tip: put your very
    strongest work first because if they aren’t hooked in the first 10 seconds, they may not watch the rest of your reel.

    3. Make the reel original on the inside, NOT on the outside. Human resources, along with actual animators, will be looking at your reel, and they don’t care about a fancy outside package or what you include along with the reel and resume. From key chains to toys, I’ve seen people include all kinds of things with their reels that do not relate to their animation skills. Put all of your originality into the actual animation content. Make it fun and original for people to watch, but don’t overdo it. Your best bet is to put your resume and shot breakdowns as the cover insert of the DVD case so it can’t get lost or separated from your reel. Also, put your name and contact info inside the case and on the DVD just in case it gets separated and passed around. You’d hate to think they fell in love with your reel and then couldn’t figure out who it belonged to!

    4. Do NOT include stuff that is too distracting, whether it’s music or fancy titles. If you have a reel with a dialogue animation test, and the music is too loud for people to hear the dialogue, or you overdub mega-loud techno music throughout the whole thing, it will conflict with the purpose of the reel, which is to show your animation skills as clearly and simply as you can. Everything else should be secondary.

    5. Do NOT include anything animated by others. Be very clear and honest about what you have done. The industry is very small -- people go from company to company and they are very familiar with everyone’s work. Always include a credit list of the shots on the reel and what you animated for them. In the event that a shot is actually shared by two or more animators, you should clarify the work that you did.

    6. Bring your own personality to the reel. Ultimately, many people can learn the techniques. What’s interesting to see and what recruiters look for, is the personality, the actor behind the reel. You’ll stand out if you can show your creativity in your acting choices. Show you can be subtle as well as do big performances. Don’t include content based on others’ animations. We don’t want to see a “Pixar” reel. Instead, we are looking for the talented actor that can help a studio make their work much more distinctive. It does help to be aware of the style of animation that a particular studio has or what kind of work they create. You wouldn’t want to apply to
    a VFX Studio with a reel that has only cartoon work, or apply to a place where they do cartoon-type of work with a reel containing only creature work.

    7. Find out what to submit and how. Go through the studios’ online sites and find out exactly what they need from you before you apply to them. Chances are, they may need you to submit a form before you send anything, or they may ask you to submit your portfolio in a particular way or format.

    8. Be respectful and patient with the people reviewing your work. It doesn’t help your chances if as soon as the studio gets your reel, you call or email the recruiters and animators a dozen times a day. Be considerate with their time, and most importantly treat them with respect. They are here to help you and their job is not easy with hundreds of reels to watch over several hours. This is good to keep in mind after you send a reel, and you don’t hear from them immediately.

    9. Pay attention to the details. Check your DVD and make sure it works before you submit it. Don’t use menus or make a recruiter work to figure out how to play your reel. Keep it simple. The best DVDs just start playing as soon as you load them.

    10. And lastly, keep trying, and keep refining your animation. When you’ve progressed, resubmit your reel to show your growth and the new work. It takes time, motivation, skill and creativity to succeed in this fun and motivating career.

    I hope this helps you!
    Carlos

    09 February, 2010

    12 Basic Principles of Animation ~

    I got these off of Wikipedia, I like it because it goes into good detail describing each principle.
    __________________________________________________________________

    The 12 basic principles of animation is a set of principles of animation introduced by the Disney animators Ollie Johnston and Frank Thomas in their 1981 book The Illusion of Life: Disney Animation. Johnston and Thomas in turn based their book on the work of the leading Disney animators from the 1930s onwards, and their effort to produce more realistic animations. The main purpose of the principles was to produce an illusion of characters adhering to the basic laws of physics, but they also dealt with more abstract issues, such as emotional timing and character appeal.

    The book and its principles have become generally adopted, and have been referred to as the 'Bible of the industry'. In 1999 the book was voted number one of the "best animation books of all time" in an online poll. Though originally intended to apply to traditional, hand-drawn animation, the principles still have great relevance for today's more prevalent computer animation.

    The 12 principles

    Illustration of the "squash and stretch"-principle:
    Example A shows a ball bouncing with a rigid, non-dynamic movement. In example B the ball is "squashed" at impact, and "stretched" during fall and rebound. The movement also accelerates during the fall, and slows down towards the apex (see "slow in and slow out").

    Squash and stretch

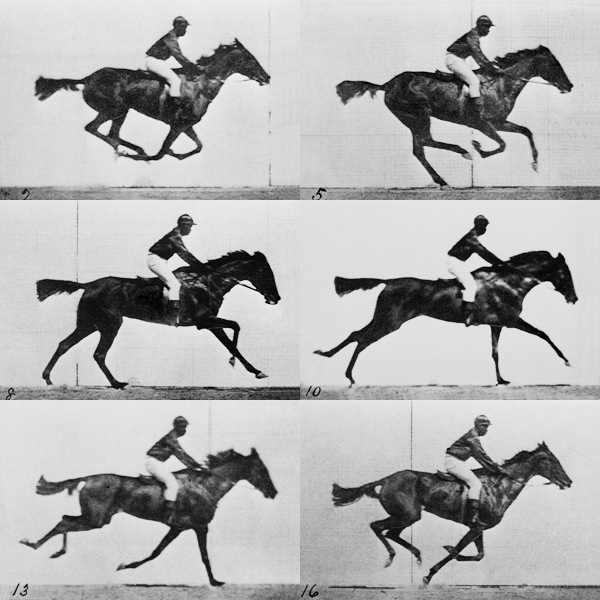
    Animated sequence of a race horse galloping. Photos taken by Eadweard Muybridge. The horse's body demonstrates squash and stretch in natural musculature.

    The most important principle is "squash and stretch",the purpose of which is to give a sense of weight and flexibility to drawn objects. It can be applied to simple objects, like a bouncing ball, or more complex constructions, like the musculature of a human face.Taken to an extreme point, a figure stretched or squashed to an exaggerated degree can have a comical effect. In realistic animation, however, the most important aspect of this principle is the fact that an object's volume does not change when squashed or stretched. If the length of a ball is stretched vertically, its width (in three dimensions, also its depth) needs to contract correspondingly horizontally.

    Anticipation

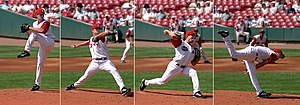
    Anticipation is used to prepare the audience for an action, and to make the action appear more realistic. A dancer jumping off the floor has to bend his knees first; a golfer making a swing has to swing the club back first. The technique can also be used for less physical actions, such as a character looking off-screen to anticipate someone's arrival, or attention focusing on an object that a character is about to pick up.

    Anticipation: A baseball player making a pitch prepares for the action by moving his arm back.

    For special effect, anticipation can also be omitted in cases where it is expected. The resulting sense of anticlimax will produce a feeling of surprise in the viewer, and can often add comedy to a scene. This is often referred to as a 'surprise gag'.

    Staging

    This principle is akin to staging as it is known in theatre and film. Its purpose is to direct the audience's attention, and make it clear what is of greatest importance in a scene; what is happening, and what is about to happen. Johnston and Thomas defined it as "the presentation of any idea so that it is completely and unmistakably clear", whether that idea is an action, a personality, an expression or a mood. This can be done by various means, such as the placement of a character in the frame, the use of light and shadow, and the angle and position of the camera. The essence of this principle is keeping focus on what is relevant, and avoiding unnecessary detail.

    Straight ahead action and pose to pose

    These are two different approaches to the actual drawing process. "Straight ahead action" means drawing out a scene frame by frame from beginning to end, while "pose to pose" involves starting with drawing a few, key frames, and then filling in the intervals later. "Straight ahead action" creates a more fluid, dynamic illusion of movement, and is better for producing realistic action sequences. On the other hand, it is hard to maintain proportions, and to create exact, convincing poses along the way. "Pose to pose" works better for dramatic or emotional scenes, where composition and relation to the surroundings are of greater importance. A combination of the two techniques is often used.

    Computer animation removes the problems of proportion related to "straight ahead action" drawing; however, "pose to pose" is still used for computer animation, because of the advantages it brings in composition. The use of computers facilitates this method, as computers can fill in the missing sequences in between poses automatically. It is, however, still important to oversee this process, and apply the other principles discussed.

    Follow through and overlapping action

    These closely related techniques help render movement more realistic, and give the impression that characters follow the laws of physics. "Follow through" means that separate parts of a body will continue moving after the character has stopped. "Overlapping action" is the tendency for parts of the body to move at different rates (an arm will move on different timing of the head and so on). A third technique is "drag", where a character starts to move and parts of him take a few frames to catch up. These parts can be inanimate objects like clothing or the antenna on a car, or parts of the body, such as arms or hair. On the human body, the torso is the core, with arms, legs, head and hair appendices that normally follow the torso's movement. Body parts with much tissue, such as large stomachs and breasts, or the loose skin on a dog, are more prone to independent movement than bonier body parts. Again, exaggerated use of the technique can produce a comical effect, while more realistic animation must time the actions exactly, to produce a convincing result.

    Thomas and Johnston also developed the principle of the "moving hold". A character not in movement can be rendered absolutely still; this is often done, particularly to draw attention to the main action. According to Thomas and Johnston, however, this gave a dull and lifeless result, and should be avoided. Even characters sitting still can display some sort of movement, such as the torso moving in and out with breathing.

    Slow in and slow out

    The movement of the human body, and most other objects, needs time to accelerate and slow down. For this reason, an animation looks more realistic if it has more frames near the beginning and end of a movement, and fewer in the middle. This principle goes for characters moving between two extreme poses, such as sitting down and standing up, but also for inanimate, moving objects, like the bouncing ball in the above illustration.

    Arcs

    Most human and animal actions occur along an arched trajectory, and animation should reproduce these movements for greater realism. This can apply to a limb moving by rotating a joint, or a thrown object moving along a parabolic trajectory. The exception is mechanical movement, which typically moves in straight lines.

    Secondary action: as the horse runs, its mane and tail follow the movement of the body.

    Secondary action

    Adding secondary actions to the main action gives a scene more life, and can help to support the main action. A person walking can simultaneously swing his arms or keep them in his pockets, he can speak or whistle, or he can express emotions through facial expressions. The important thing about secondary actions is that they emphasize, rather than take attention away from the main action. If the latter is the case, those actions are better left out. In the case of facial expressions, during a dramatic movement these will often go unnoticed. In these cases it is better to include them at the beginning and the end of the movement, rather than during.

    Timing

    Timing in reality refers to two different concepts: physical timing and theatrical timing. It is essential both to the physical realism, as well as to the storytelling of the animation, that the timing is right. On a purely physical level, correct timing makes objects appear to abide to the laws of physics; for instance, an object's weight decides how it reacts to an impetus, like a push. Theatrical timing is of a less technical nature, and is developed mostly through experience. It can be pure comic timing, or it can be used to convey deep emotions. It can also be a device to communicate aspects of a character's personality.

    Exaggeration

    Exaggeration is an effect especially useful for animation, as perfect imitation of reality can look static and dull in cartoons. The level of exaggeration depends on whether one seeks realism or a particular style, like a caricature or the style of an artist. The classical definition of exaggeration, employed by Disney, was to remain true to reality, just presenting it in a wilder, more extreme form. Other forms of exaggeration can involve the supernatural or surreal, alterations in the physical features of a character, or elements in the storyline itself. It is important to employ a certain level of restraint when using exaggeration; if a scene contains several elements, there should be a balance in how those elements are exaggerated in relation to each other, to avoid confusing or overawing the viewer.

    Solid drawing

    The principle of solid — or good — drawing, really means that the same principles apply to an animator as to an academic artist. The drawer has to understand the basics of anatomy, composition, weight, balance, light and shadow etc. For the classical animator, this involved taking art classes and doing sketches from life. One thing in particular that Johnston and Thomas warned against was creating "twins": characters whose left and right sides mirrored each other, and looked lifeless. Modern-day computer animators in theory do not need to draw at all, yet their work can still benefit greatly from a basic understanding of these principles.

    Appeal

    Appeal in a cartoon character corresponds to what would be called charisma in an actor. A character who is appealing is not necessarily sympathetic — villains or monsters can also be appealing — the important thing is that the viewer feels the character is real and interesting. There are several tricks for making a character connect better with the audience; for likable characters a symmetrical or particularly baby-like face tends to be effective.